
Introduction to Homemade Bread
When you’re a young professional juggling deadlines, meetings, and perhaps a side hustle, the idea of making homemade bread might seem daunting. However, let me assure you—it’s a game changer. Not only is it therapeutic, but it also adds a unique touch to your meals and offers a rewarding sense of accomplishment. If you’re feeling trapped in the endless cycle of takeout and pre-packaged foods, this could be the perfect creative outlet.
Why Homemade Bread is a Game Changer for Young Professionals
Imagine walking into your kitchen, the warm aroma of freshly baked bread wrapping around you like a cozy blanket. It’s not just about eating; it’s about the experience. Baking homemade bread allows you to unplug, get your hands a little messy, and focus on something purely satisfying. Here are a few reasons why you should consider incorporating this skill into your life:
-
Health Benefits: Store-bought bread often contains preservatives and excess sugar. When you bake at home, you control the ingredients. You can substitute healthier options and even experiment with whole grains, as suggested by the Whole Grains Council.
-
Cost-Effective: A loaf of artisan bread can set you back five to ten dollars or more. However, with just a few basic ingredients—flour, water, yeast, and salt—you can whip up a delicious loaf for a fraction of the cost.
-
Skill Development: Imagine mastering the art of bread-making—it’s an impressive skill to add to your repertoire. It not only makes for great dinner party conversation but also impresses friends and family during gatherings.
-
Customizable: Feeling adventurous? You can play with flavors! Add herbs, cheese, nuts, or even dried fruit. Experimenting with homemade bread recipes can spark your culinary creativity.
Perhaps you’ve never considered baking bread before because it feels too time-consuming or complex. However, once you understand the basics and the science behind it, you’ll find it’s not just achievable but also enjoyable. Plus, who doesn’t love a warm slice of bread with a pat of butter as a reward for their hard work?
So go ahead, roll up your sleeves, and let’s get started on this delicious journey into the world of homemade bread!
Ingredients for Homemade Bread
Essential Ingredients for the Perfect Loaf
Making your own homemade bread is not just about the taste; it’s about the rewarding experience. To get started, you’ll need a few basic ingredients:
- Flour: Bread flour is best due to its higher protein content, which creates that wonderful gluten structure.
- Water: Warm water (about 110°F) is ideal, as it helps activate the yeast without killing it.
- Yeast: Active dry yeast is a great choice. For convenience, you can also use instant yeast.
- Salt: This enhances flavor and controls yeast activity. Don’t skip it!
- Sweetener: Sugar or honey can help kickstart fermentation and give your bread a nice crust.
For more tips on selecting flour, check out this comprehensive guide from King Arthur Baking.
Optional Ingredients for Customization
Once you’re comfortable with the basics, feel free to explore! Consider adding:
- Fats: Olive oil or butter can make your bread tender and enrich its flavor.
- Seeds and Grains: Sunflower seeds, flaxseeds, or oats can add texture and nutritional benefits.
- Herbs and Spices: Fresh rosemary or garlic powder can elevate your loaf with delightful aromas.
With just these simple ingredients, you can create a tasty, customizable homemade bread that satisfies your cravings!
Step-by-step Preparation of Homemade Bread
Creating your own homemade bread can be one of the most rewarding kitchen experiences. The aroma that fills the house as it bakes, the crispy crust, and the soft, warm interior make every moment of preparation worthwhile. Ready to dive in? Let’s walk through the process step-by-step.
Gather your ingredients and tools
Before you start, it’s essential to have everything in one place. Here’s what you’ll need:
Ingredients:
- 4 cups all-purpose flour
- 2 tsp salt
- 2 tsp sugar (optional for a slightly sweeter taste)
- 1 packet (2 ¼ tsp) active dry yeast or instant yeast
- 1 ½ cups warm water (about 110°F, or 43°C)
- 2 tbsp olive oil (optional for added flavor)
Tools:
- Large mixing bowl
- Measuring cups and spoons
- Mixing spoon or spatula
- Clean surface for kneading
- A baking pan or sheet
- A kitchen towel or plastic wrap for covering
Having everything in one spot makes the process smoother and more enjoyable.
Mix dry ingredients and activate the yeast
Once your ingredients are at the ready, it’s time to mix! In a large bowl, combine your flour, salt, and sugar. These dry ingredients will be the base of your bread. If you’re using active dry yeast, it’s best to activate it by dissolving it in the warm water. Let it sit for about 5 minutes, until it becomes frothy. If you’re impatient, instant yeast can be mixed directly with the dry ingredients.
For a deeper dive into yeast activation, check out this in-depth guide on yeast types from King Arthur Baking.
Combine and knead the dough
Now that your yeast is ready, pour the warm water (with yeast) into the dry ingredients. Add olive oil if you choose. Stir the mixture until it forms a shaggy dough. Once combined, it’s time to knead! On a floured surface, take the dough and fold, push, and turn it for about 8-10 minutes. You’re aiming for a smooth, elastic texture.
Kneading activates gluten, which is what gives your bread that lovely chewy structure. A trick is to push the dough away from you using the palms of your hands and fold it back over itself.
First rise and how to know it’s ready
After kneading, place the dough in a lightly oiled bowl, cover it with a kitchen towel or plastic wrap, and let it rise in a warm place for about 1-2 hours, until it’s doubled in size. A great tip to know if it’s ready: poke a finger into the dough; if the indentation remains, you’re good to go!
Shape your dough and second rise
Once your dough has risen, punch it down gently to release the air. Now comes the shaping! Transfer the dough onto a floured surface and form it into a loaf shape or divide it into rolls. Place it into a greased pan or shape it for a baking sheet. Cover it again and let it rise for another 30-45 minutes.
Preheat oven and prepare for baking
As your dough rises, don’t forget to preheat your oven to 375°F (190°C). This allows for an even bake. If you want to get fancy, you can even score the top of your homemade bread with a sharp knife just before it goes into the oven. This allows steam to escape and creates a beautiful pattern.
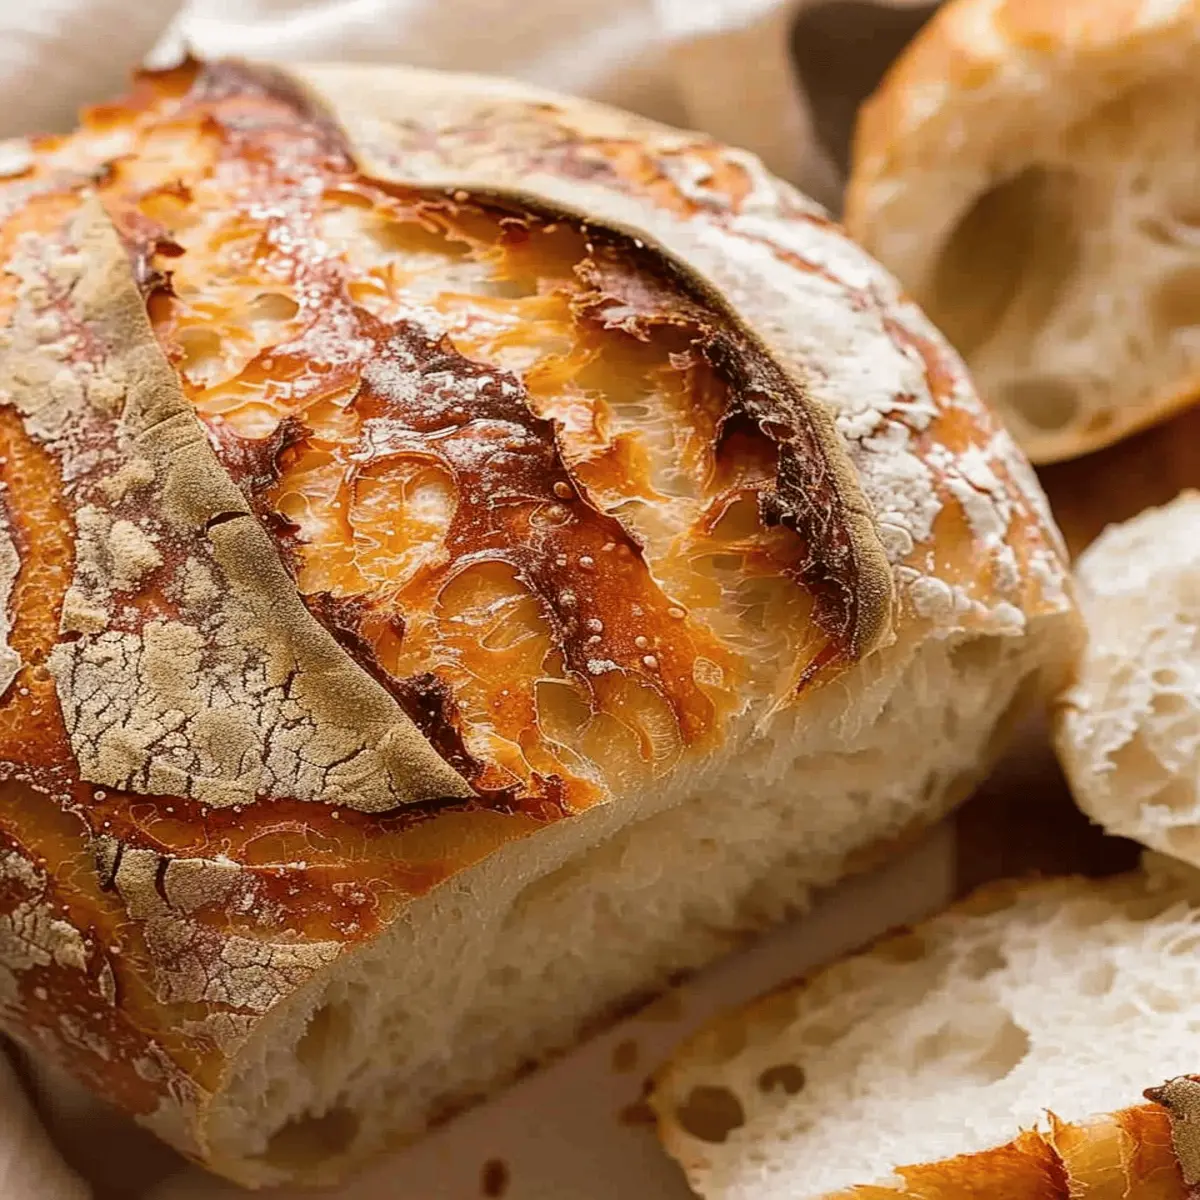
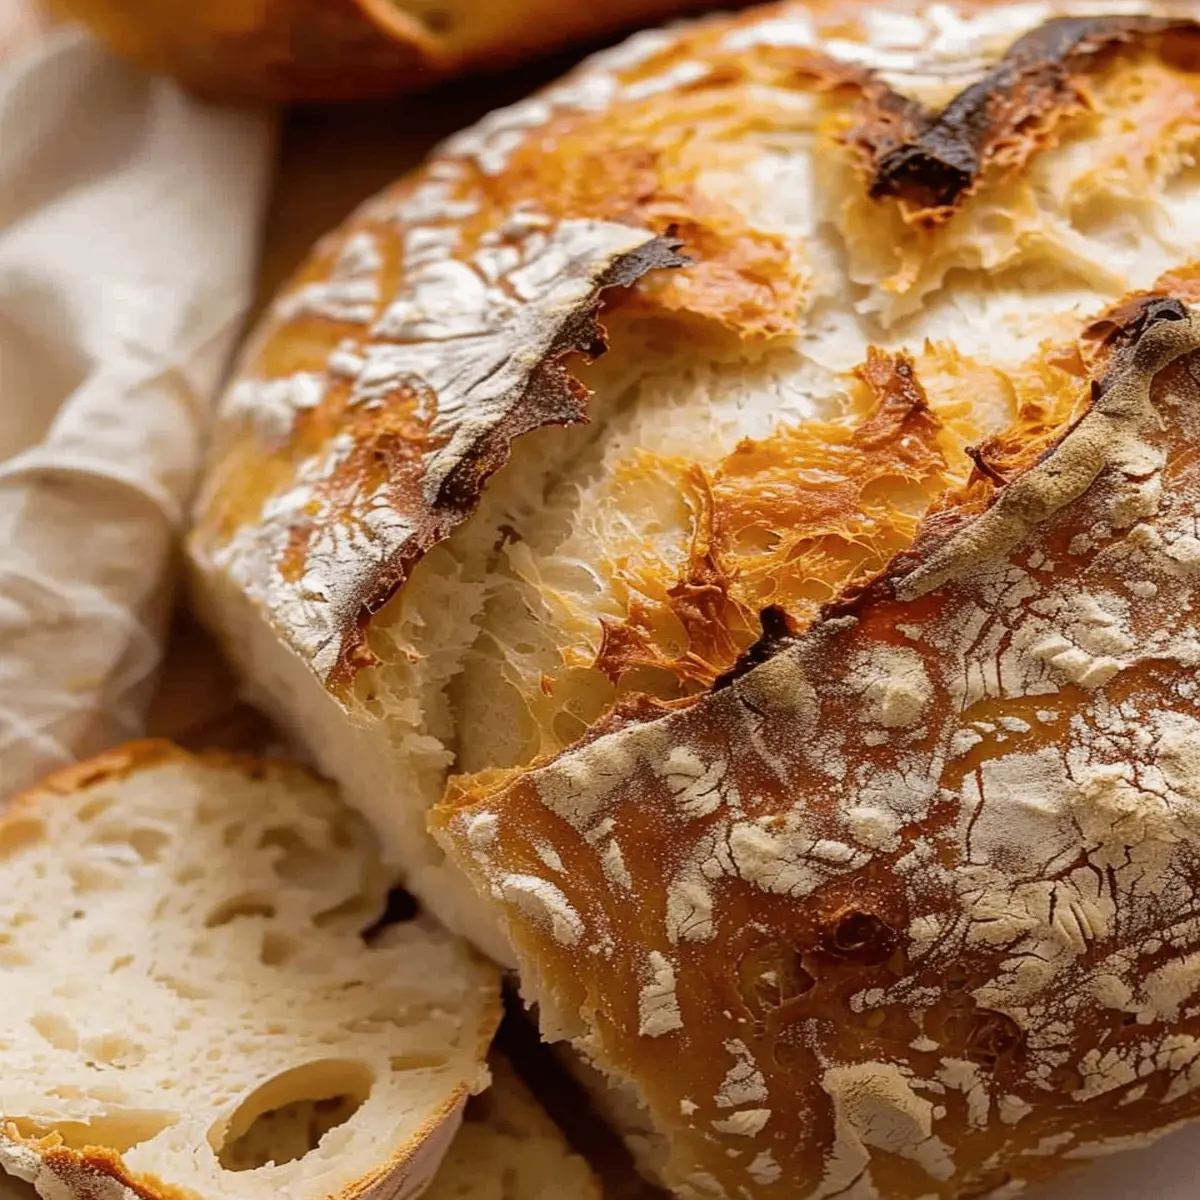
Bake and cool your homemade bread
Finally, it’s time for the magical moment! Bake your bread for about 30-35 minutes or until golden brown. To check for doneness, tap the bottom; if it sounds hollow, you’re in business. Remove it from the oven and let it cool on a wire rack. While it’s tempting to cut right in, allow it to cool—this helps enhance the flavor and texture.
There you have it! Your fresh homemade bread is ready to be devoured. The joy of baking your own bread is not just about the end product; it’s the love and care you put into each step! Happy baking!
Variations on Homemade Bread
When it comes to homemade bread, the possibilities are as endless as your creativity in the kitchen! Whether you’re in the mood for something hearty, fluffy, or a touch sweet, here are some delightful variations that can elevate your baking game.
Rustic Whole Grain Bread
Imagine a loaf bursting with flavor and texture—that’s rustic whole grain bread for you. Using a mix of whole wheat and rye flour, this bread is not only satisfying but packed with nutrients. It pairs beautifully with soups or can be enjoyed as toast topped with your favorite spreads. For an even heartier touch, consider adding seeds or nuts for added crunch and health benefits.
Fluffy White Sandwich Bread
Sometimes, you just crave the classic! Fluffy white sandwich bread is an absolute delight, with a soft crumb that makes the perfect base for any sandwich. This bread is achieved by using all-purpose flour and a little sugar and butter, giving it that beautifully tender texture. As you bite into it, you’ll appreciate its mild flavor—a blank canvas for all your lunch creations!
Herb-Infused Focaccia
If you’re looking to impress, herb-infused focaccia is your go-to. With loads of olive oil and fresh herbs, this Italian staple sings with flavor. It’s fantastic as a side dish, or even enjoyed on its own. You can experiment with toppings—think olives, sun-dried tomatoes, or even a sprinkle of sea salt for that gourmet touch. The aroma wafting through your kitchen will undoubtedly draw in friends and family!
Sweet Bread for Breakfast
And let’s not overlook the joy of sweet breads! Think cinnamon rolls or banana bread—perfect for a cozy breakfast or brunch. A slice of homemade sweet bread, perhaps topped with a bit of cream cheese, can be the ideal way to start your day. You might find yourself experimenting with different fruits, nuts, or even chocolate chips!
Incorporating these variations into your baking repertoire will not only keep things interesting but will also transform your home into the ultimate bakery. What will you try first? Check out King Arthur Baking for even more inspiration and resources to refine your baking skills.
Cooking Tips and Notes for Homemade Bread
Common Pitfalls and How to Avoid Them
Making homemade bread can feel intimidating, but knowing common pitfalls can boost your confidence. One major issue is over-kneading the dough, which can lead to tough bread. Aim for a smooth and elastic texture—it should bounce back when poked. Also, ensure your yeast is fresh! Old yeast can ruin your rise; check the expiration date, or learn how to activate it properly. Lastly, don’t rush the rising process. Patience is key—allowing the dough to double in size guarantees a fluffy final product.
Helpful Tools and Equipment for Success
Having the right tools can make your bread-making journey a breeze. Here’s a quick list to get you started:
- A kitchen scale for accurate measurements.
- A mixing bowl large enough for the dough to expand.
- A loaf pan or baking stone for even baking.
- A digital thermometer to check internal temperature—aim for 190°F for perfectly baked bread.
- A bench scraper to easily manage your dough.
If you’re curious about fermentation techniques, check this resource for a deeper dive into homemade bread science. Happy baking!

Serving Suggestions for Homemade Bread
Creative Spreads and Toppings
When it comes to homemade bread, the right spread or topping can elevate your experience to something extraordinary. Consider these delightful options:
- Herbed Cream Cheese: Mix cream cheese with fresh herbs like chives or dill for a refreshing twist.
- Avocado Smash: Creamy avocado complemented with a sprinkle of sea salt and a dash of lime is always a hit.
- Honey Butter: Whip together some softened butter with honey for a sweet and creamy treat perfect for breakfast.
- Pesto Delight: Try a layer of basil pesto topped with sliced tomatoes and a sprinkle of feta for a Mediterranean flair.
Pairing Homemade Bread with Meals
Homemade bread isn’t just for snacks; it can be a wonderful companion to various meals. Think of serving it alongside:
- Soups and Stews: A warm bowl of tomato soup or hearty chili pairs beautifully with crusty bread for dipping.
- Salads: Use it as the base for a bruschetta topped with fresh vegetables or grilled chicken, turning a simple salad into a full-course meal.
- Breakfast Plates: Serve slices of your bread alongside scrambled eggs or in an open-face breakfast sandwich for a satisfying start to the day.
These serving suggestions will help inspire you to make the most out of your homemade bread. If you’re interested in more creative ideas, check out this blog post for innovative recipes!
Time Breakdown for Homemade Bread
Preparation Time
Let’s dive right in! For homemade bread, you’re looking at about 15-20 minutes to gather your ingredients and mix everything together. It’s a simple process—just flour, water, yeast, and salt—yet each step is crucial for that delicious end result. Don’t rush; enjoy the rhythm of kneading the dough.
Rising Time
Now comes the waiting game, and here’s where the magic happens. Allow your dough to rise for 1 to 2 hours in a warm spot until it doubles in size. This step is essential; during fermentation, the yeast creates those lovely air bubbles that give your bread that delightful texture.
Baking Time and Cooling Down
Once your dough has risen, preheat your oven and bake for approximately 25-30 minutes. As those golden crusts form, your kitchen will fill with an irresistible aroma! After baking, let it cool for at least 15-20 minutes before slicing. This is crucial as it ensures the texture sets well.
Total Time for Homemade Bread
Adding it all up, you’re looking at a total time of roughly 2 to 3 hours from start to finish. While this may seem lengthy, much of that time involves letting the magic happen. So set aside a leisurely afternoon, and you’ll be rewarded with comforting homemade bread that’s perfect for any meal. For more tips on bread-making, check out resources from the King Arthur Baking Company or The Spruce Eats for additional recipes and advice.
Nutritional Facts for Homemade Bread
Average calories per slice
On average, one slice of homemade bread contains around 70-80 calories, depending on the ingredients used. If you’re using whole grains or adding seeds and nuts, the calorie count may rise slightly, but the nutritional value will also improve. If you’re keeping an eye on your diet, you might be surprised at how easy it is to enjoy freshly baked bread without piling on the calories.
Nutritional benefits of homemade bread
Making homemade bread isn’t just a treat for your senses; it also packs a nutritional punch. Here’s why it’s a fantastic option:
- Quality Ingredients: You control what goes in, which means no preservatives or added sugars. This gives you a more wholesome product.
- Fiber Boost: Using whole grains can significantly increase your fiber intake. According to the Dietary Guidelines for Americans, a high-fiber diet can help reduce the risk of heart disease and improve digestive health.
- Vitamins and Minerals: Homemade options are often richer in B vitamins and essential minerals like iron, which are vital for energy levels and overall well-being.
So, next time you’re craving a slice, consider making your own! You’ll not only enjoy that irresistible aroma filling your kitchen but also take pride in the knowledge that you’re enjoying a healthier alternative. For more insights on the benefits of whole grains, check out the Whole Grains Council for more detailed information.
FAQs About Homemade Bread
How long does homemade bread last?
Homemade bread is best enjoyed fresh, but it can last for several days if stored properly. Typically, it will stay good for about 3 to 5 days at room temperature. To extend its shelf life, keep it in a sealed bag or bread box away from direct sunlight. If you’d like more tips on bread storage, check out this informative guide from King Arthur Baking.
Can I freeze homemade bread?
Absolutely! Freezing is an excellent way to preserve your delicious homemade bread. To freeze, allow the loaf to cool completely, then wrap it tightly in plastic wrap or aluminum foil, and place it in an airtight container. You can freeze homemade bread for up to 3 months. When you’re ready to enjoy it again, let it thaw at room temperature for a couple of hours or slice and toast it directly from frozen.
What can I do if my bread doesn’t rise?
If your homemade bread isn’t rising, don’t fret—this happens more often than you might think! Here are a few troubleshooting tips:
- Check your yeast: Ensure it’s fresh and active. You can test this by mixing it with warm water and a pinch of sugar; it should foam up after a few minutes.
- Warm environment: Bread dough loves warmth. If your kitchen is cold, consider placing it in a draft-free area or preheating the oven briefly and then turning it off to let the dough rise.
How can I add flavor to homemade bread?
Elevating the flavor of your homemade bread is surprisingly easy! Consider adding:
- Fresh herbs like rosemary or thyme for an aromatic touch.
- Garlic or onion powder for a savory punch.
- Cheese, nuts, or dried fruits for texture and taste.
Experimenting with flavors is part of the fun of making your own bread! For more flavor ideas, check out Food52’s tips.
Conclusion on Homemade Bread
Embracing the Joy of Homemade Bread
There’s something magical about pulling a loaf of homemade bread from the oven. The rich aroma that fills your kitchen can transform an ordinary day into something special. Not only is it a cost-effective way to enjoy fresh bread, but baking at home also allows you to customize flavors and ingredients to suit your palate.
Imagine serving warm, crusty slices to family and friends—nothing rivals that cozy feeling. If you’re new to baking, take the leap! There are countless resources available, including the King Arthur Baking Company, known for their helpful guides and techniques. So grab your apron, and start your homemade bread journey! You won’t regret it.
PrintHomemade Bread: The Best Soft and Flavorful Loaf Ever!

Learn how to make the best homemade bread that is soft and full of flavor!
- Prep Time: 15 minutes
- Cook Time: 35 minutes
- Total Time: 1 hour 50 minutes
- Yield: 1 loaf 1x
- Category: Breads
- Method: baking
- Cuisine: American
- Diet: vegetarian
Ingredients
- 4 cups all-purpose flour
- 2 teaspoons salt
- 2 tablespoons sugar
- 1 packet active dry yeast
- 1.5 cups warm water
- 2 tablespoons olive oil
Instructions
- In a large bowl, combine warm water, sugar, and yeast. Let it sit for 5 minutes.
- Add olive oil, salt, and flour to the mixture and stir until a dough forms.
- Knead the dough on a floured surface for about 10 minutes until smooth.
- Place the dough in a greased bowl, cover, and let it rise for 1 hour or until doubled in size.
- Punch down the dough, shape it into a loaf, and place it in a greased loaf pan.
- Cover and let it rise again for about 30 minutes.
- Bake in a preheated oven at 375°F (190°C) for 30-35 minutes.
- Let it cool before slicing.
Notes
- For a richer flavor, try adding herbs or garlic to the dough.
- Make sure the water is warm, not hot, to avoid killing the yeast.
Nutrition
- Serving Size: 1 slice
- Calories: 120
- Sugar: 1g
- Sodium: 200mg
- Fat: 3g
- Saturated Fat: 0g
- Unsaturated Fat: 3g
- Trans Fat: 0g
- Carbohydrates: 22g
- Fiber: 1g
- Protein: 4g
- Cholesterol: 0mg
Keywords: Homemade Bread, Soft Bread, Bread Recipe