
Introduction to Dark Chocolate and Sea Salt Nut Bars
Why choose homemade nut bars?
Making your own nut bars at home can be a game changer, especially if you’re looking for a nutritious snack that aligns with your health goals. Homemade nut bars allow you to control the ingredients, ensuring that they are free from additives and preservatives that often accompany store-bought versions. Plus, they offer the creative freedom to mix and match nuts, seeds, and sweeteners to your liking.
But let’s not forget the taste! There’s something incredibly satisfying about biting into a fresh, chewy nut bar that you crafted yourself. Whether you prefer a satisfying crunch or a smooth, chocolatey texture, the customization options are endless. Not to mention, making your own bars can save you money in the long run compared to those premium brands you find at the grocery store.
The benefits of dark chocolate in snacks
Incorporating dark chocolate into your snacks elevates them to a whole new level. Not only does it provide that rich, indulgent flavor we crave, but it’s also packed with health benefits. Studies suggest that dark chocolate is a powerhouse of antioxidants, which can help reduce free radicals in your body (1). It’s also linked to improved heart health, thanks to its ability to lower blood pressure and improve circulation (2).
When you pair dark chocolate with nuts, you’re not just creating a delicious treat; you’re also delivering a dose of healthy fats, protein, and fiber. This combo keeps you feeling fuller for longer, making it an ideal snack for busy professionals on the go.
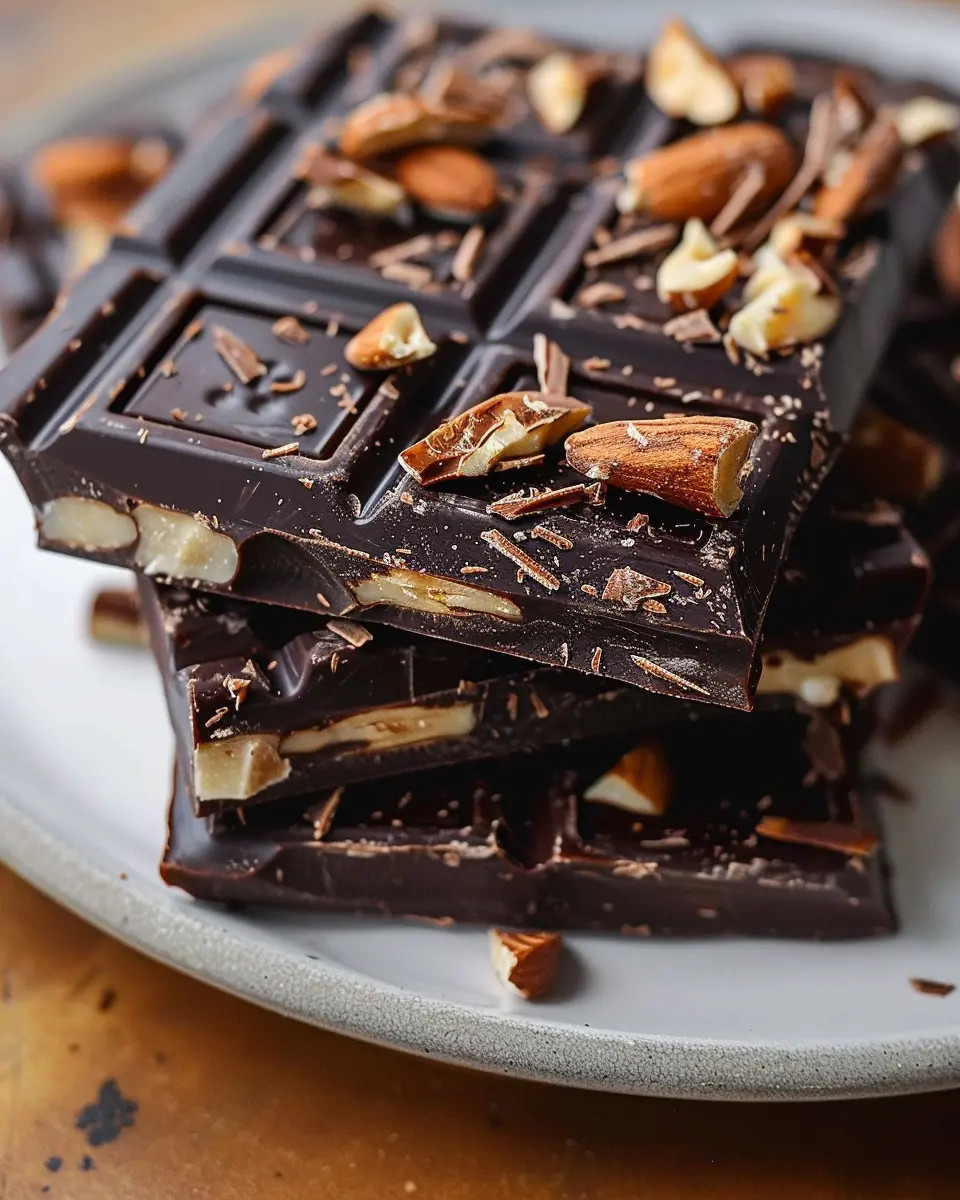
Imagine munching on a homemade nut bar that combines the crunch of almonds and the richness of dark chocolate, all enhanced with a sprinkle of sea salt to balance the sweetness. It’s a delightful way to treat yourself without the guilt!
If you’re interested in more health benefits of dark chocolate, you may want to explore articles by the American Heart Association.
As you venture into making your own dark chocolate and sea salt nut bars, you’ll realize that snacking can be both nutritious and delicious. So let’s dive into the recipe and create something special!
(1) Source: Healthline
(2) Source: Mayo Clinic
Ingredients for Dark Chocolate and Sea Salt Nut Bars
Essential ingredients overview
Creating your own dark chocolate and sea salt nut bars at home is a rewarding and delicious endeavor! To get started, here are the essential ingredients you’ll need:
- Dark Chocolate: Go for something with at least 70% cocoa for that rich, bitter flavor.
- Mixed Nuts: A combination of almonds, walnuts, and cashews works beautifully, but feel free to use your favorites!
- Nut Butter: To bind the mixture, almond or cashew butter is excellent.
- Honey or Maple Syrup: A touch of sweetness to balance the richness of the dark chocolate.
- Sea Salt: This adds an irresistible crunch and enhances the chocolate flavor.
Feel free to check out quality dark chocolate brands like Amedei or Valrhona.
Optional ingredients for customization
Personalizing your nut bars is part of the fun! Here are some optional ingredients that you can add:
- Dried Fruit: Consider adding cranberries or cherries for a burst of flavor.
- Seeds: Chia or sunflower seeds for an extra crunch.
- Spices: A pinch of cinnamon or vanilla extract can elevate the taste.
With these ingredients, you’re on your way to creating healthy snacks that are not only nutritious but also indulgently tasty!
Step-by-step Preparation of Dark Chocolate and Sea Salt Nut Bars
Making your own dark chocolate and sea salt nut bars at home is a delightful and rewarding experience. Not only are they a healthier alternative to store-bought snacks, but they are also incredibly satisfying to make. Let’s walk through the steps to create these irresistible bars!
Prep the oven and baking pan
To kick things off, preheat your oven to 350°F (175°C). This step is crucial since it ensures that your bars will bake evenly. While the oven is heating, line an 8×8-inch baking pan with parchment paper, leaving some overhang on the sides. This will make it easy to lift your finished bars out later. Lightly spray the parchment with cooking spray to prevent sticking—everyone loves a clean removal!
Toast the nuts for flavor
Next up, let’s toast our nuts. This step is one of those little tricks that can significantly enhance the flavor of your bars. Start with a mix of your favorites, like almonds, walnuts, and pecans. Spread about 1.5 cups of mixed nuts on a baking sheet in a single layer.
- Toast them in the preheated oven for about 8-10 minutes. Keep an eye on them; you want them golden and fragrant, not burnt. The smell that fills your kitchen is worth it!
- Once they’re done, let them cool slightly before chopping them coarsely. Those toasty notes paired with the rich dark chocolate will take your bars to the next level.
Mix dry ingredients and combine with wet ingredients
While your nuts cool, it’s time to prepare the base mixture. In a mixing bowl, combine:
- 1 cup rolled oats
- 1 cup crispy brown rice cereal
- 1/2 cup of your toasted nuts
- 1/2 teaspoon salt
In another bowl, whisk together your wet ingredients:
- 1/2 cup honey or maple syrup (for a vegan option)
- 1/4 cup nut butter (like almond or peanut butter)
Once both mixtures are ready, stir the dry ingredients into the wet until everything is thoroughly combined. It might be a bit sticky, but that’s precisely what you want.
Press mixture into the pan
Now it’s time to transfer your mixture into the prepared baking pan. Use a spatula or your hands (lightly greased for easy handling) to press the mixture down firmly—this helps the bars hold together post-baking. Make sure the surface is level and pack it tightly to avoid crumbly bars later.
Bake to perfection
Place your pan back in the oven and bake for 20-25 minutes, or until the edges start to turn a lovely golden color. The aroma is sure to beckon everyone into the kitchen! When done, remove it from the oven and let it cool completely in the pan for about an hour. This cooling period is critical; it allows the bars to firm up, making cutting much easier.
Melt chocolate for dipping
While your bars cool, let’s talk about the star of the show: dark chocolate. Chop about 1 cup of high-quality dark chocolate into small pieces and melt it gently:
- You can use a microwave in 30-second bursts, stirring in between, or go the classic route with a double boiler over low heat.
- Just make sure not to overheat; we want it melted, not scorched.
If you’re curious about chocolate types and benefits, check out this guide on Healthline.
Dip and drizzle the bars
With your nut bars cooled and your dark chocolate melted, it’s the fun part: the dipping!
- Slice your nut mixture into bars and dip each one halfway into the melted chocolate.
- Place them on a parchment-lined tray and sprinkle a pinch of sea salt on top—this will create a fantastic flavor contrast and a stunning finish.
Drizzle any leftover chocolate over the bars for an extra layer of decadence. Let the bars sit at room temperature until the chocolate hardens, or pop them in the fridge for quicker results.
And there you have it! Your homemade dark chocolate and sea salt nut bars are ready for indulging. They are perfect as a grab-and-go snack or a sweet treat to share (if you want to!). Enjoy your delicious creation!
Variations on Dark Chocolate and Sea Salt Nut Bars
When it comes to crafting your own dark chocolate and sea salt nut bars, the variations are nearly endless. Let’s dive into some exciting adaptations that can cater to different dietary preferences and spice up your snacking experience.
Nut-free or Seed-based Options
If you or someone you know has a nut allergy, fear not! You can easily replace the nuts with seeds. Think pumpkin seeds, sunflower seeds, or even chia seeds. They offer great texture and nutrients while pairing beautifully with the rich flavors of dark chocolate. For a delightful crunch, try adding toasted rolled oats or crispy rice cereal, which can provide that satisfying bite without any nuts.
- Suggested seed combinations:
- Pumpkin seeds for a hint of sweetness
- Sunflower seeds for extra crunch
- A blend of chia and flaxseeds for health benefits
For a more filling bar, consider integrating nutrient-rich ingredients like quinoa or amaranth. You’ll be surprised at how these simple substitutions can create a delicious yet safe treat!
Adding Spices for an Extra Kick
Want to elevate your dark chocolate bars to gourmet levels? Spice up your recipe! Think cinnamon, cayenne, or even a hint of sea salt to intensify the chocolate flavor. A pinch of espresso powder can also enhance the richness, giving you that luxurious café taste right at home.
Ponder this: Have you ever tasted a chocolate treat that danced on your taste buds? Adding spices not only creates a complex flavor profile but also contributes additional health benefits. For instance, cinnamon is known for its antioxidant properties, making your indulgence a bit healthier.
Embrace these creative tweaks and enjoy your customized dark chocolate and sea salt nut bars. If you’re looking for inspiration, check out resources like Nutritional Insights for additional healthy snack ideas!
Regardless of your preferences, I hope these variations inspire you to make your own unique treat. Happy bar-making!
Cooking Tips and Notes for Dark Chocolate and Sea Salt Nut Bars
Tips for Perfecting the Texture
Getting the texture just right is key to a successful nut bar. When melting your dark chocolate, be sure to use a double boiler or microwave at low power to avoid scorching. Stir it gently as it melts; this ensures a silky smooth consistency. If you prefer a crunchier bar, consider briefly toasting your nuts in a dry skillet before mixing them in. This brings out their natural oils and adds delightful flavor. Experiment with different nut combinations, like pecans and almonds, to find your perfect balance!
Storage Advice for Longer Shelf Life
To keep your dark chocolate and sea salt nut bars fresh, store them in an airtight container at room temperature. If you’re looking to extend their shelf life, consider refrigerating them. Just ensure they’re wrapped well to prevent moisture from ruining that delicious texture. Did you know that sealed properly, nut bars can last up to two weeks? For more about nut preservation, visit The Nuts for Life website for tips.
Enjoy your nutty adventure!

Serving Suggestions for Dark Chocolate and Sea Salt Nut Bars
Ideal occasions for serving
Dark chocolate and sea salt nut bars are incredibly versatile and can shine at various events. Planning a cozy movie night? These bars make for a delightful snack that pairs perfectly with popcorn. Hosting a brunch? Slice them into bite-sized pieces and present them on a platter for guests to enjoy alongside fresh fruit and yogurt. They also serve as a satisfying energy boost during outdoor adventures, whether it’s a hike or a weekend picnic.
Pairing ideas with beverages
When it comes to beverages, think outside the traditional pairings and get creative! Dark chocolate complements a range of beverages beautifully:
- Freshly Brewed Coffee: The rich notes in coffee enhance the chocolate flavor, perfect for a morning or afternoon treat.
- Herbal Teas: Try pairing your nut bars with chai or peppermint tea for a soft contrast and a hint of spice.
- Nut Milk Smoothies: Blend nut milk with bananas and spinach for a rich, nutritious drink that complements the bars.
For more pairing suggestions, consider checking resources like the Specialty Coffee Association for expert coffee pairings. Enjoy exploring different combinations, and feel free to mix things up! After all, the joy of dark chocolate lies in its endless adaptability.
Time Breakdown for Dark Chocolate and Sea Salt Nut Bars
Preparation Time
Getting ready to whip up your dark chocolate and sea salt nut bars is a breeze! You’ll need about 15 minutes to gather your ingredients and prepare your workspace. This means measuring out your nuts and seeds, melting the dark chocolate, and mixing it all together. Pro-tip: Have everything laid out to make the process smooth and enjoyable!
Cooking Time
The baking time for these delicious bars is around 20 minutes. You’ll want to keep a close eye, as the chocolate can melt quickly. When the bars come out, the aromas will fill your kitchen, enticing everyone nearby.
Total Time
In just about 35 minutes, you’ll have homemade dark chocolate and sea salt nut bars ready to enjoy! Isn’t it great how you can whip up a delicious snack in under an hour? For more efficient snacks, consider checking out resources on meal prepping here.
Nutritional Facts for Dark Chocolate and Sea Salt Nut Bars
Key nutritional information per bar
Each Dark Chocolate and Sea Salt Nut Bar is a delicious and nutritious treat, offering approximately:
- Calories: 200
- Fat: 12g (of which 6g is saturated)
- Carbohydrates: 18g
- Protein: 6g
- Fiber: 3g
- Sugar: 5g
These bars provide a great balance of nutrients, making them a healthy snack option.
Health benefits of dark chocolate
Dark chocolate is more than just a tasty indulgence; it’s tied to numerous health benefits. Rich in antioxidants, it helps combat oxidative stress, and studies suggest that moderate consumption can improve heart health by lowering blood pressure and enhancing blood flow. Moreover, the flavanols found in dark chocolate may help boost brain function and mood.
Want to dive deeper into the benefits of dark chocolate? Check out sources like Harvard Health for the latest research. By incorporating these nut bars into your snack rotation, you’re not just satisfying your sweet tooth; you’re also nourishing your body!
FAQs about Dark Chocolate and Sea Salt Nut Bars
How do I make these bars healthier?
Looking to boost the healthiness of your dark chocolate and sea salt nut bars? Here are a few simple tweaks you can try:
- Reduce sugar: You can cut down on added sugars by using ripe bananas or unsweetened applesauce as a sweetener.
- Add in seeds: Flaxseeds and chia seeds are loaded with omega-3 fatty acids and fiber – toss in a handful!
- Opt for dark chocolate with higher cocoa content: A chocolate that’s 70% cocoa or more offers more antioxidants and less sugar.
For more health tips, check out the resources at the American Heart Association.
Can I substitute ingredients?
Absolutely! Flexibility is key in cooking. Here’s where you can get creative with your dark chocolate and nut bars:
- Nuts: Swap out almonds for walnuts or pecans based on your preference or what you have on hand.
- Nut Butter: If you’re not keen on almond butter, peanut butter or sunflower seed butter work perfectly, too.
- Sweeteners: Feel free to use maple syrup instead of honey if you’re aiming for a vegan option.
How long do these bars last?
These tasty treats have a good shelf life! If stored properly in an airtight container, your nut bars can last up to 2 weeks at room temperature. For longer storage, consider freezing them, where they can maintain their flavor for up to three months. Just make sure to use parchment paper to separate each bar for easy access later.
Now you’re equipped with the knowledge to enjoy your dark chocolate and sea salt nut bars, guilt-free and bursting with flavor!
Conclusion on Dark Chocolate and Sea Salt Nut Bars
Recap on the Joys of Homemade Snacks
Creating your own snacks, like dark chocolate and sea salt nut bars, is not just a delightful culinary adventure; it’s also a way to nourish your body with thoughtful ingredients. Homemade snacks can be healthier and tailored to your specific tastes, making them a perfect alternative to store-bought options. Plus, they often come with the joy of sharing, whether with friends during a weekend get-together or simply enjoying a quiet moment at home.
Encouragement to Experiment with the Recipe
Don’t hesitate to make this recipe your own! Use different nuts or adjust the amount of dark chocolate to suit your preferences—maybe you prefer a darker, richer flavor or want to add a hint of spice. The beauty of homemade snacks lies in the ability to personalize them. Cooking is an art, and each adjustment is a stroke of your unique flavor palette.
For more inspiration, check out Bon Appétit’s guide on healthy snacking. Happy snacking!
PrintDark Chocolate Delights: Easy Recipes for Sweet Indulgence
Indulge in these delicious and easy recipes featuring dark chocolate that will satisfy your sweet tooth.
- Prep Time: 10 minutes
- Cook Time: 25 minutes
- Total Time: 35 minutes
- Yield: 8 servings 1x
- Category: Dessert
- Method: Baking
- Cuisine: American
- Diet: Vegetarian
Ingredients
- 200 grams dark chocolate
- 100 grams butter
- 150 grams sugar
- 2 eggs
- 100 grams flour
- 1 teaspoon vanilla extract
Instructions
- Melt the dark chocolate and butter together.
- In a bowl, mix the sugar and eggs until fluffy.
- Add the melted chocolate mixture to the egg mixture.
- Fold in the flour and vanilla extract gently.
- Pour the batter into a prepared baking dish.
- Bake at 180°C (350°F) for 20-25 minutes.
Notes
- For extra flavor, add a pinch of sea salt on top before baking.
- Serve with whipped cream for a decadent treat.
Nutrition
- Serving Size: 1 piece
- Calories: 250
- Sugar: 20 grams
- Sodium: 150 mg
- Fat: 15 grams
- Saturated Fat: 9 grams
- Unsaturated Fat: 5 grams
- Trans Fat: 0 grams
- Carbohydrates: 30 grams
- Fiber: 4 grams
- Protein: 3 grams
- Cholesterol: 60 mg
Keywords: Dark Chocolate, Desserts, Easy Recipes