
Introduction to Cast Iron Skillet Cherry Danish Recipe
Are you looking for a delicious and impressive dessert that’s simple enough for even novice bakers? Let me introduce you to the Cast Iron Skillet Cherry Danish Recipe. This delightful dish combines the sweet, tart flavor of cherries with the flaky, buttery perfection of pastry, all conveniently cooked in a cast iron skillet. There’s something undeniably satisfying about baking in cast iron. Not only does it provide even heat distribution, but it also creates a gorgeous golden crust that’s hard to achieve with traditional bakeware.
Why a Cherry Danish in a Cast Iron Skillet?
Imagine pulling your Cast Iron Skillet Cherry Danish out of the oven, the rich aroma wafting through your kitchen. The best part? This recipe makes use of your trusty cast iron skillet, a kitchen staple that every home chef should own. Not only does cast iron retain heat exceptionally well, ensuring that each bite of Danish is cooked perfectly, but it also transitions seamlessly from stovetop to oven.
Plus, using a cast iron skillet lends a rustic charm to your presentation, making it ideal for brunch gatherings with friends or a cozy family breakfast. Picture this: You’re catching up with loved ones, and there it is, your beautifully baked Danish at the center of the table—how impressive is that?
Here’s a little tip: If cherries aren’t your jam (no pun intended!), you can easily switch them out for any seasonal fruit. Blueberries, peaches, or even apples can create delightful variations, so feel free to get creative. According to the USDA, using seasonal fruits not only enhances flavor but also supports local agriculture.
When preparing your Cast Iron Skillet Cherry Danish, you’ll want to keep a few things in mind:
- Quality Ingredients: Use fresh or frozen cherries for the best results. They pack the most flavor.
- Perfect Dough: Whether you choose to make your own pastry dough or use store-bought, ensure it’s cold and flaky.
- Cooking Technique: Don’t rush the process; allow the pastries to brown to perfection in your skillet.
So, gather your ingredients and let’s get started on this delightful journey to create a Cast Iron Skillet Cherry Danish. Trust me, once you try it, it’ll become a treasured recipe in your collection!
Ingredients for Cast Iron Skillet Cherry Danish
When you’re ready to whip up a delicious Cast Iron Skillet Cherry Danish Recipe, having the right ingredients is key. Let’s dive into what you’ll need to create this mouthwatering treat.
Essential ingredients you’ll need
- Puff Pastry: This forms the base, providing that delicious flaky texture.
- Cherries: Fresh or frozen, cherries are the star of the show! Opt for tart cherries for a lovely zing, or sweet ones if you prefer.
- Cream Cheese: Adds a rich, creamy element that complements the cherries beautifully.
- Sugar: A bit of granulated sugar for sweetness is essential.
- Vanilla Extract: A splash adds a lovely aroma and flavor.
- Egg: This will be used for egg wash, giving your Danish that golden, shiny finish.
Optional add-ins for creativity
Feel like getting a bit adventurous? Here are some optional add-ins to elevate your Cast Iron Skillet Cherry Danish:
- Almond Extract: A dash enhances the nutty flavor.
- Raspberry or Blueberry Filling: Mix in or swap some cherries for a different berry experience.
- Nuts: Chopped almonds or walnuts can add a delightful crunch.
- Honey or Maple Syrup: For a more complex sweetness, drizzle some on top after baking.
Getting creative with your ingredients is part of the fun! For more tips on working with puff pastry, check out Serious Eats.
With these ingredients in hand, you’re all set to create a warm, comforting dish that’s perfect for brunch or dessert. Happy baking!
Step-by-Step Preparation of Cherry Danish
Creating a delicious Cast Iron Skillet Cherry Danish is an enjoyable weekend project that not only fills your home with delightful aromas but also satisfies your sweet tooth. Let’s dive into the step-by-step process to make this mouthwatering treat that’s perfect for brunch, dessert, or even a snack!
Gather your ingredients
Before diving into the culinary fun, start by gathering all your necessary ingredients. Here’s what you’ll need for a delightful Cherry Danish:
- 1 can of cherry pie filling
- 1 package of refrigerated biscuit dough (preferably the flaky kind)
- 4 ounces of cream cheese
- 1 tablespoon of sugar
- 1 teaspoon of vanilla extract
- 1 egg, beaten (for egg wash)
- Powdered sugar (for drizzle)
- 1-2 tablespoons of milk (for drizzling)
Preparation is key to any recipe. Having everything ready will make your baking experience smoother and more enjoyable, eliminating last-minute kitchen chaos. Don’t hesitate to check out this guide on organizing your kitchen for efficiency.
Preheat and prepare the skillet
Now that everything is in place, preheat your oven to 375°F (190°C). While the oven is warming up, grab your trusty cast iron skillet. If you haven’t used it in a while, make sure it’s clean and seasoned. A well-seasoned cast iron skillet not only prevents sticking but also adds a lovely depth of flavor to your Cast Iron Skillet Cherry Danish.
Lightly grease the skillet with butter or cooking spray to ensure that your Danish can be easily removed post-baking. You want every morsel to come out perfectly!
Create the cherry base
Next, let’s whip up the cherry base. In a medium-sized bowl, open the can of cherry pie filling and mix it a bit to break down the cherries and incorporate the sauce evenly. You can also add a sprinkle of cinnamon or a touch of lemon juice for zest if you like!
Spread this cherry mixture evenly into the bottom of your greased skillet, forming a delightful layer that will be the heart of your Danish.
Dip biscuits and layer on top
Now comes the fun part—layering! Open your package of biscuit dough and take each biscuit individually. Quickly dip each biscuit into some melted butter or simply brush it on.
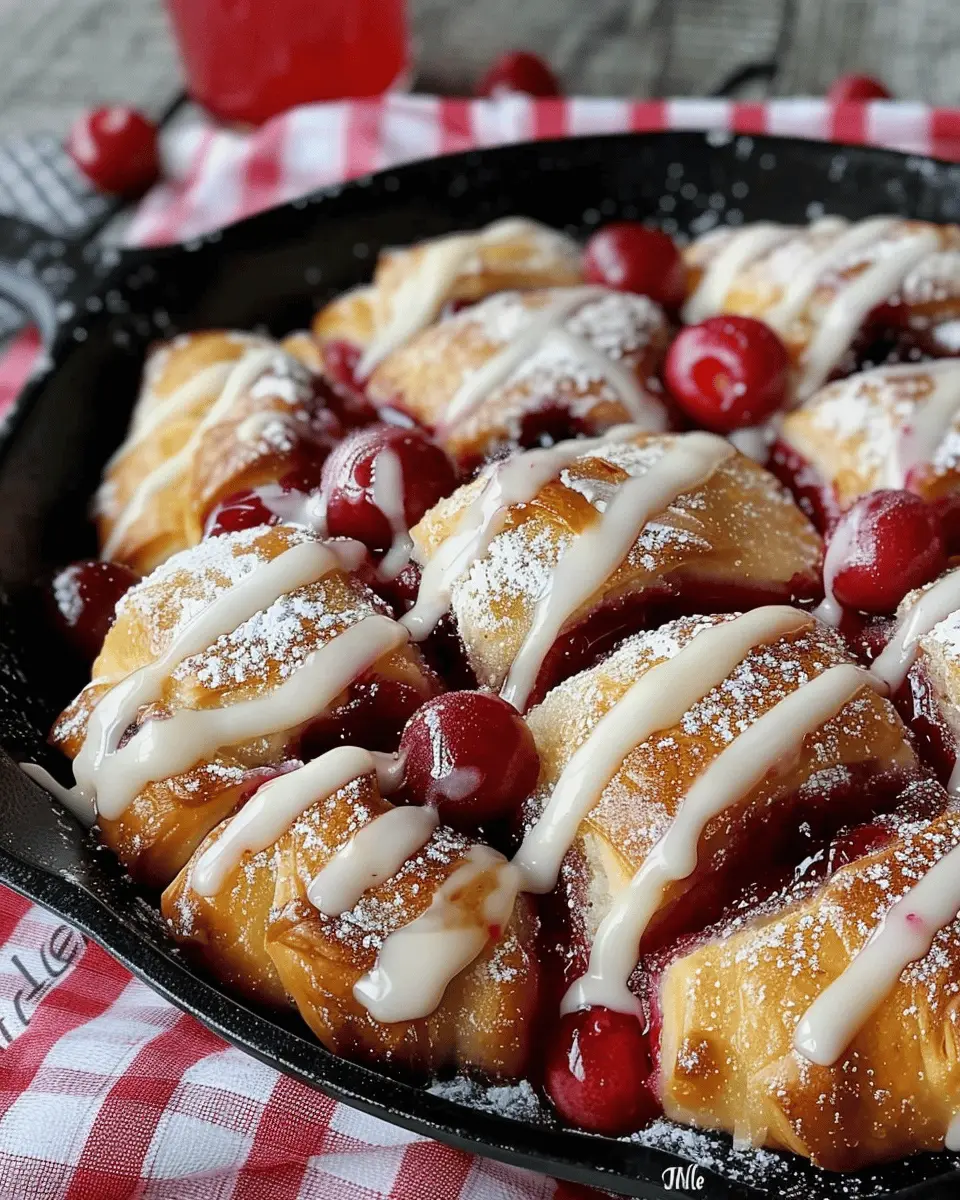
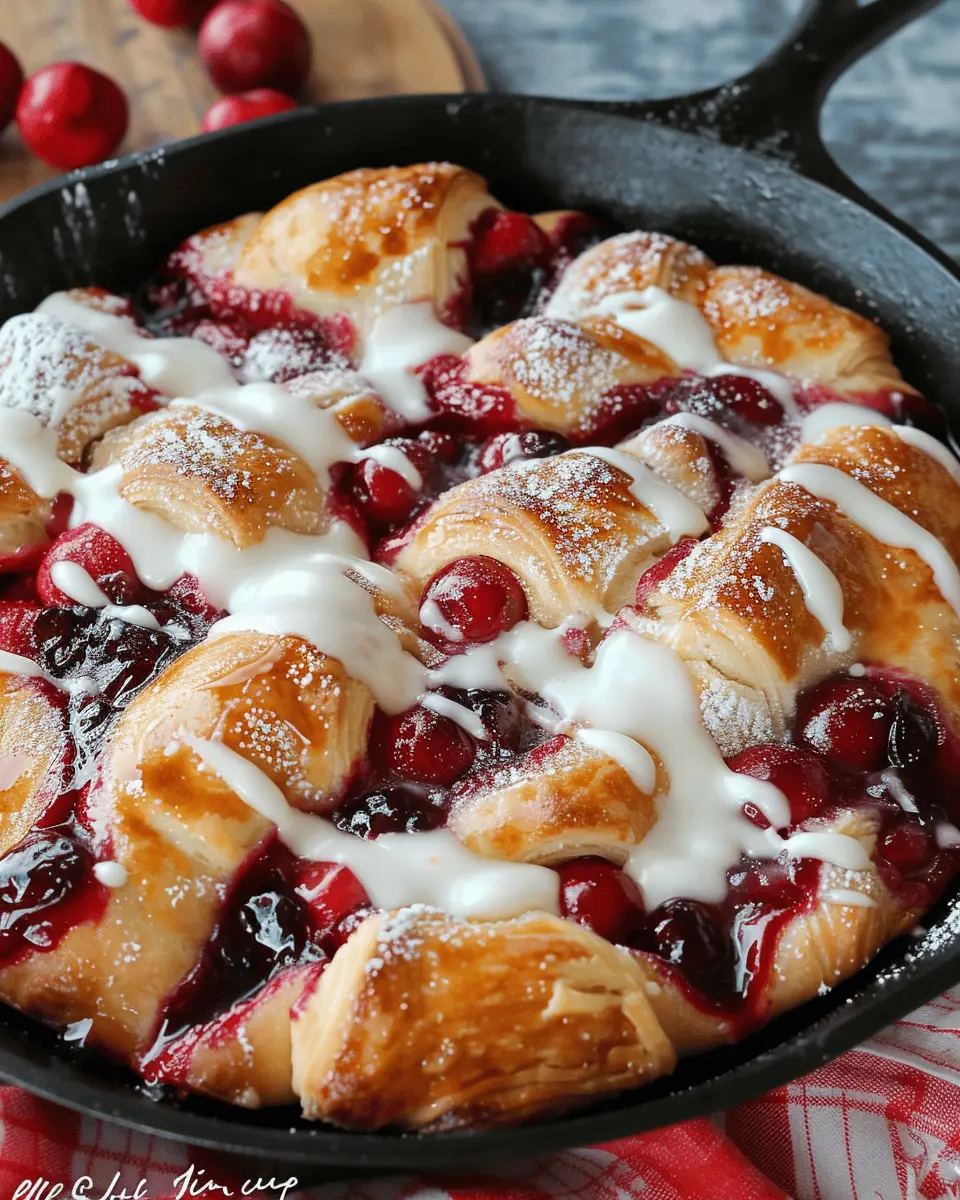
Then, place the biscuit dough pieces directly on top of the cherry base in the skillet, slightly overlapping them. This creates that classic Danish look while allowing the cherry filling to peek through.
Bake until golden
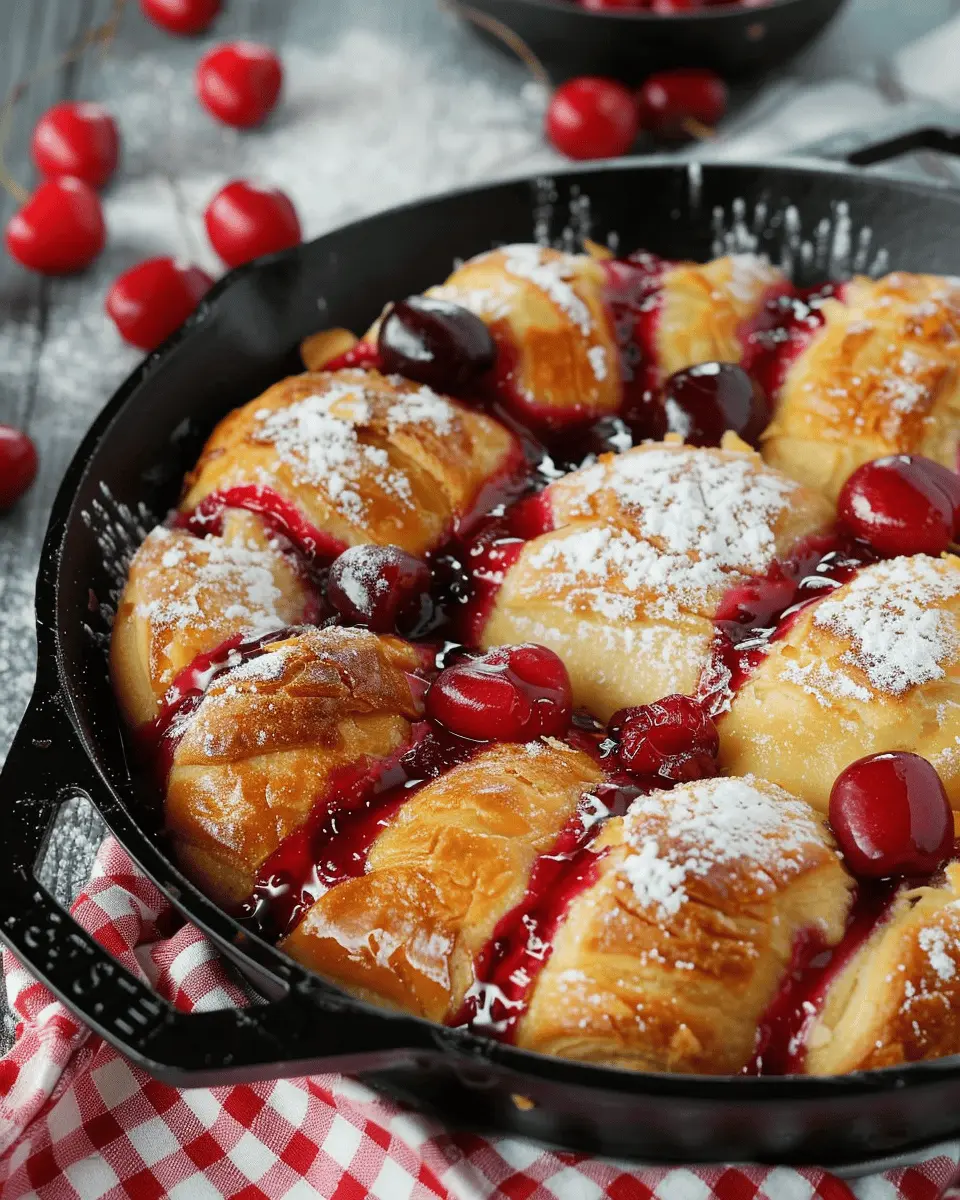
Place your skillet in the preheated oven and bake for about 25-30 minutes, or until the biscuits turn a beautiful golden brown. The scent of baking cherry goodness will fill your kitchen, and your anticipation will be at an all-time high. Make sure to check the progress a few minutes before the timer goes off; you want them golden, not overdone!
Make the cream cheese drizzle
While your Dutch beauty is baking, let’s prepare the cream cheese drizzle. In a small bowl, combine 4 ounces of cream cheese, 1 tablespoon of sugar, 1 teaspoon of vanilla extract, and milk until you achieve a smooth texture. Adjust the consistency by adding more milk if necessary. This drizzle will elevate your Cherry Danish by adding a creamy, sweet note.
Serve and enjoy
Once baked, allow your Cherry Danish to cool for a few minutes before drizzling your cream cheese mixture beautifully over the top. Slice up and serve while still warm. It’s best to enjoy this Danish fresh, but leftovers can be wrapped and stored in the fridge for a day or two, though we doubt there’ll be many left!
Indulge in the burst of cherries surrounded by fluffy biscuits and the creamy drizzle—it’s a match made in breakfast (or dessert) heaven. This simple yet impressive Cast Iron Skillet Cherry Danish Recipe is bound to charm your friends and family alike. So, gather your ingredients, grab that skillet, and create some delicious memories!
Variations on Cast Iron Skillet Cherry Danish
When it comes to a Cast Iron Skillet Cherry Danish Recipe, the possibilities are nearly endless! While the classic cherry filling is irresistible, experimenting with different flavors can add a unique twist to your brunch or dessert table.
Different Fruit Combinations
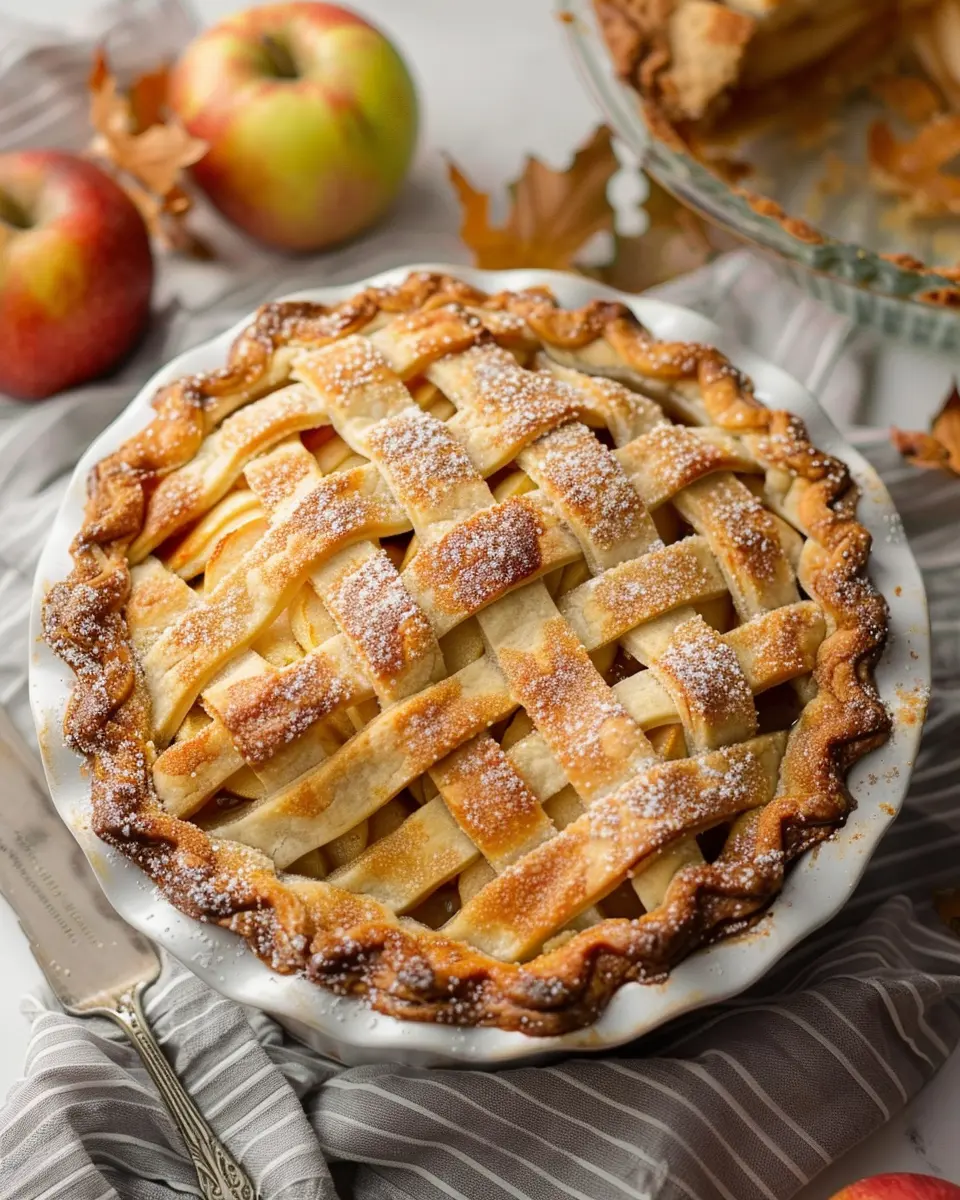
Why stick to only cherries? Try mixing it up with seasonal fruits like blueberries, peaches, or even apricots. A combination of strawberries and rhubarb can give you that delightful tartness, while apples paired with cinnamon create a cozy fall vibe. Not only do these fruits provide amazing flavors, but they can also change the texture of your Danish, making each variation a delightful surprise!
Gluten-Free Option
For those who are gluten-sensitive, enjoy your delicious Cast Iron Skillet Cherry Danish without worry! Substitute all-purpose flour with a gluten-free flour blend. Brands like Bob’s Red Mill or King Arthur offer excellent options that yield tender and flaky pastries. Just ensure you’re using a 1-to-1 gluten-free flour that includes xanthan gum, which helps replicate that perfect structure.
Adding Spices for Extra Flavor
Want to elevate your cherry Danish even further? Incorporate spices like cardamom or nutmeg into your filling. A pinch of cinnamon is also a great match with cherries and adds warmth to the dish. You can even sprinkle some lemon zest on top for a zesty finish that balances the sweetness beautifully.
So whether you’re swaying towards traditional or daring to be different, remember that each alteration you experiment with can create a memorable twist on the Cast Iron Skillet Cherry Danish Recipe. Happy baking!
Cooking Tips for Cherry Danish
Ideal Skillet Care
Taking proper care of your cast-iron skillet is essential to your Cast Iron Skillet Cherry Danish Recipe success. Seasoning is crucial — it creates a non-stick surface and enhances flavor. Make sure to wash your skillet with warm water and a soft sponge after each use, avoiding soap. For tougher residue, use a bit of coarse salt as an abrasive. Once clean, dry it thoroughly and rub a light coat of oil to keep it seasoned.
Baking Tips for the Best Results
When preparing your cherry Danish, preheat your oven thoroughly; an even temperature is key to rising and browning. If you’re using fresh cherries, consider adding a bit of sugar and cornstarch to thicken the juice — this prevents a soggy pastry. Always watch your baking time; cast iron conducts heat well, and your Danish may bake faster than in a conventional pan. For that golden finish, try brushing the top with a bit of melted butter before baking.
For more insight on cast-iron care, visit Serious Eats for expert tips that can elevate your culinary game.
Serving Suggestions for Cherry Danish
Ice cream or whipped cream?
When indulging in your Cast Iron Skillet Cherry Danish, consider the delightful addition of a scoop of vanilla ice cream or a dollop of fresh whipped cream. The creamy texture of ice cream beautifully contrasts with the flaky layers of the Danish, enhancing the overall experience. If you decide on whipped cream, try incorporating a hint of almond extract for a nutty twist that complements the cherry filling.
Perfect pairings with beverages
Pair your warm Cherry Danish with a cup of freshly brewed coffee—its rich, bold flavors balance perfectly with the sweetness of the pastry. Alternatively, a soothing herbal tea adds a lighter touch, enhancing the fruity notes of the cherries. For something refreshing, a glass of sparkling lemonade is a surprising but fantastic companion that lifts the whole dish.
Embrace these serving suggestions to elevate your enjoyment of the Cast Iron Skillet Cherry Danish Recipe and turn a casual snack into a delightful treat.
For tips on perfect pairings, check out this guide to coffee or this collection of herbal tea options.
Time Breakdown for Cherry Danish
Preparation Time
Getting started on your Cast Iron Skillet Cherry Danish Recipe is a breeze! You’ll need about 15 minutes to gather your ingredients and prepare the dough. This includes measuring out your flour, sugar, and of course, the cherries. If you’re short on time, pre-made dough can be a lifesaver, cutting your prep time significantly.
Cooking Time
Once your Danish is prepped, it’s time to pop it in the oven. Expect around 25-30 minutes of baking time. This is where the magic happens—your skillet will transform into a golden, bubbly delight!
Total Time
In total, you’re looking at about 45-50 minutes from start to finish. This makes it perfect for a weekend brunch or even a cozy midweek treat. For more tips on perfecting your baking skills, check out sources like King Arthur Baking or The Kitchn, which offer amazing baking insights.
Ready to impress your friends or family with this simple yet delicious Cherry Danish? Let’s dive into the recipe!
Nutritional Facts for Cherry Danish
Caloric Content
When indulging in a Cast Iron Skillet Cherry Danish, a single serving typically contains around 300-350 calories. This delightful pastry is a treat, making it perfect for special occasions or a weekend brunch.
Overview of Key Nutrients
Not only does your Cherry Danish taste incredible, but it also offers a variety of essential nutrients:
- Carbohydrates: Provides the energy you need, derived mainly from the dough and cherries.
- Fiber: The cherries contribute some fiber, aiding in digestion and keeping you feeling full.
- Vitamins and Minerals: Cherries are rich in antioxidants and vitamins such as vitamin C, which supports your immune system.
For a healthier twist, consider using whole wheat flour in your Cast Iron Skillet Cherry Danish Recipe. This can increase the fiber content and add a nutty flavor! If you’re curious about the benefits of whole grains, you can find more information at Whole Grains Council.
Baking can be both tasty and nutritious, so enjoy this recipe knowing it brings joy to your palate while still being mindful of your health.
FAQs about Cherry Danish Recipe
Can I use fresh cherries instead of pie filling?
Absolutely! Using fresh cherries elevates your Cast Iron Skillet Cherry Danish Recipe to a new level. Just be sure to pit and halve the cherries before using them. You might want to add a bit of sugar or a sprinkle of cornstarch to thicken the juices and enhance the flavor. Fresh cherries will give your Danish a lovely, tart contrast that complements the sweetness of the pastry beautifully.
How do I store leftovers?
If you’re lucky enough to have leftovers, storing your Cherry Danish is simple. Allow it to cool completely and then wrap it tightly in plastic wrap or aluminum foil. Alternatively, you can place it in an airtight container. It should stay fresh at room temperature for about two days. For longer storage, pop it into the fridge, where it will keep for up to a week. To enjoy it again, just reheat in the oven for a few minutes until warmed through – you’ll get that delightful crispness back!
Can this recipe be made ahead of time?
Definitely! Making your Cast Iron Skillet Cherry Danish Recipe ahead of time is a great option for meal prep or entertaining. You can prepare the dough and filling the night before and assemble it the next day. Just park the assembled Danish in the fridge before baking; this way, it’s ready to pop into the oven when you’re ready to impress your guests. If you’re a planner, consider assembling it in a cast-iron skillet for some extra flavor infusion.
For more tips on storage and meal prep, check out this helpful guide on cherry storage. Happy baking!
Conclusion on Cherry Danish Recipe
Recap of the Recipe Highlights
In this Cast Iron Skillet Cherry Danish Recipe, we’ve explored how easy it is to craft this delightful pastry from scratch. With its flaky layers and sweet cherry filling, this danish is not just a treat for the taste buds but also a visual delight. Using a cast iron skillet ensures even heat distribution, giving you a beautifully baked treat every time.
Encouragement to Try at Home
Why not give this recipe a try at home? It’s perfect for brunch gatherings or a cozy Saturday morning. Plus, you’ll impress your friends with your baking skills! With a few simple ingredients and a dash of creativity, you can whip up this delicious Cherry Danish. Don’t forget to share your results—after all, cooking is better when it’s shared! For more tips on baking, consider checking out resources like The Kitchn or Serious Eats. Happy baking!
PrintCast Iron Skillet Cherry Danish Recipe: Easy and Irresistibly Delicious

Learn how to make a delicious Cast Iron Skillet Cherry Danish that’s easy to prepare and irresistibly tasty.
- Prep Time: 15 minutes
- Cook Time: 30 minutes
- Total Time: 45 minutes
- Yield: 8 servings 1x
- Category: Dessert
- Method: Baking
- Cuisine: American
- Diet: Vegetarian
Ingredients
- 1 cup fresh cherries, pitted
- 1/2 cup sugar
- 1 tablespoon cornstarch
- 1 teaspoon vanilla extract
- 1 package refrigerated crescent roll dough
- 1 egg (for egg wash)
- 1 tablespoon water
- 1/2 teaspoon almond extract
- 1 tablespoon butter (for greasing)
Instructions
- Preheat your oven to 375°F (190°C).
- In a saucepan, combine cherries, sugar, cornstarch, and vanilla extract. Cook over medium heat until the mixture thickens.
- Unroll the crescent roll dough and place it in the greased skillet, forming a crust.
- Spoon the cherry mixture over the crust.
- Fold the edges of the crust over the filling.
- In a bowl, whisk together the egg and water, then brush the mixture over the crust.
- Bake for 25-30 minutes until golden brown.
- Let it cool slightly before serving.
Notes
- For an extra touch, drizzle icing on top after cooling.
Nutrition
- Serving Size: 1 piece
- Calories: 220
- Sugar: 10g
- Sodium: 300mg
- Fat: 8g
- Saturated Fat: 3g
- Unsaturated Fat: 5g
- Trans Fat: 0g
- Carbohydrates: 32g
- Fiber: 1g
- Protein: 3g
- Cholesterol: 30mg
Keywords: Cast Iron Skillet Cherry Danish Recipe, Cherry Danish, Skillet Recipe, Easy Danish Recipe