Introduction to Garlic Bread Rolls
Garlic bread rolls have a unique way of transforming your everyday meals into something extraordinary. If you’re a young professional juggling a busy schedule, you’re likely on the lookout for simple yet effective ways to elevate your dining experience. That’s where these delightful rolls come into play.
Picture this: it’s a weekday evening, and you’ve just returned home from a long day at work. You’re starving but don’t have the time or energy to whip up a gourmet feast. What if I told you that with just a handful of ingredients and a little bit of time, you could create garlic bread rolls that not only taste incredible but are also sure to impress?
According to a survey conducted by the National Culinary Association, more than 60% of young professionals are seeking meal options that are quick, easy, and flavorful. Garlic bread rolls check all those boxes! They are perfect as a side dish, an appetizer, or even a stand-alone snack. With their buttery, garlicky goodness, they instantly elevate the most basic of pasta dishes or even just a bowl of soup.
Wondering how to make them versatile? You can easily customize your garlic bread rolls by adding herbs, cheese, or proteins like Turkey Bacon or Chicken Ham. Feel free to explore variations based on your taste preference. Need more inspiration? Check out websites like Serious Eats for gourmet twists that will keep your culinary creativity alive.
For those concerned about health, the good news is that these rolls can be made with whole grain or gluten-free flour! This allows you to enjoy that delicious garlic flavor without compromising on your dietary needs.
So whether you’re looking for a quick fix for dinner, a party snack, or just something warm and comforting after a tough day, garlic bread rolls are here to save the day. Ready to dive into this recipe? Let’s get baking!
Ingredients for Garlic Bread Rolls
When it comes to making mouthwatering garlic bread rolls, having the right ingredients is crucial. Let’s dive into what you’ll need for those fluffy, flavorful bites.
Essential components for fluffy and flavorful rolls
To create the perfect rolls, gather these key ingredients:
- All-purpose flour: This is the foundation of your rolls, providing the right structure.
- Instant yeast: A must for that light and airy texture.
- Warm water: Activates the yeast and helps the dough rise beautifully.
- Sugar: Just a touch to feed the yeast and enhance flavor.
- Salt: Balances the sweetness and enhances overall taste.
- Olive oil: Adds moisture and richness.
Additional ingredients for the garlic butter
Now, let’s talk about the garlic butter that takes these rolls to the next level. You’ll need:
- Unsalted butter: For the base, rich and creamy is the way to go.
- Fresh garlic: Minced finely for that bold flavor punch.
- Parsley: Fresh is best; it adds a lovely touch of green and freshness.
- Optional cheese: A hint of grated Parmesan or mozzarella can be irresistible!
With these simple yet essential ingredients in hand, you’re ready to bake some of the best garlic bread rolls you’ve ever tasted! For more tips on mastering dough, check out this guide on bread-making.
Step-by-step Preparation of Garlic Bread Rolls
Garlic bread rolls are a delightful addition to any meal, combining the comforting flavors of bread and garlic with a light, fluffy texture. Here’s a step-by-step guide to help you create these delicious rolls that will impress your friends and family. Let’s roll up our sleeves and get started!
Melt the garlic butter
To get that irresistible flavor started, the first step is to make your garlic butter. Melt ½ cup of unsalted butter in a small saucepan over low heat. Once it’s just melted, remove it from the heat and add 4-6 cloves of minced garlic. The residual heat will release the garlic’s earthy essence, creating a mouthwatering concoction. Feel free to add a pinch of chopped parsley for an added layer of freshness. For those who like a bit of a kick, consider mixing in a sprinkle of red pepper flakes. This butter will not only enhance the flavor of your garlic bread rolls but can also be used to brush on your finished product for an extra punch.
Combine and knead the dough
Next, it’s time to dive into the dough preparation. In a large mixing bowl, combine 2 cups of all-purpose flour, 1 tablespoon of granulated sugar, 1 teaspoon of salt, and 1 packet of instant yeast (about 2 ¼ teaspoons). Mix the dry ingredients well before creating a well in the center. Pour in ¾ cup of warm milk (heated to about 110°F, which is perfect for thriving yeast), along with your melted garlic butter.
Now, using a spatula or your hands, start to combine the ingredients until they form a shaggy dough. Transfer this to a floured surface and knead it for about 5-7 minutes. Kneading is key here; it helps develop gluten, resulting in light and airy rolls. If you want to dive deeper into kneading techniques, check out this great resource on the benefits of kneading from King Arthur Baking.
Shape the rolls for baking
After kneading, the dough should be smooth and elastic. Now it’s time to shape it into rolls! Divide the dough into 8-10 equal portions. Roll each portion into a ball and place it on a baking sheet lined with parchment paper. If you want your garlic bread rolls to have a fun twist, you can shape them into knots or even swirl them with your favorite cheeses before placing them on the sheet.
Let the dough rise
Cover the rolls with a clean kitchen towel and allow them to rise in a warm area until they double in size—this typically takes about 30-45 minutes. A pro tip: you can preheat your oven to the lowest setting and then turn it off. Place the rolls in the warm oven; this creates an ideal environment for rising.
Bake to golden perfection
Once your rolls have risen beautifully, it’s time for baking. Preheat your oven to 375°F (190°C). Bake the rolls for about 15-20 minutes, or until they are golden brown and sound hollow when tapped. The aroma of fresh-baked rolls will fill your kitchen, driving everyone wild with anticipation!
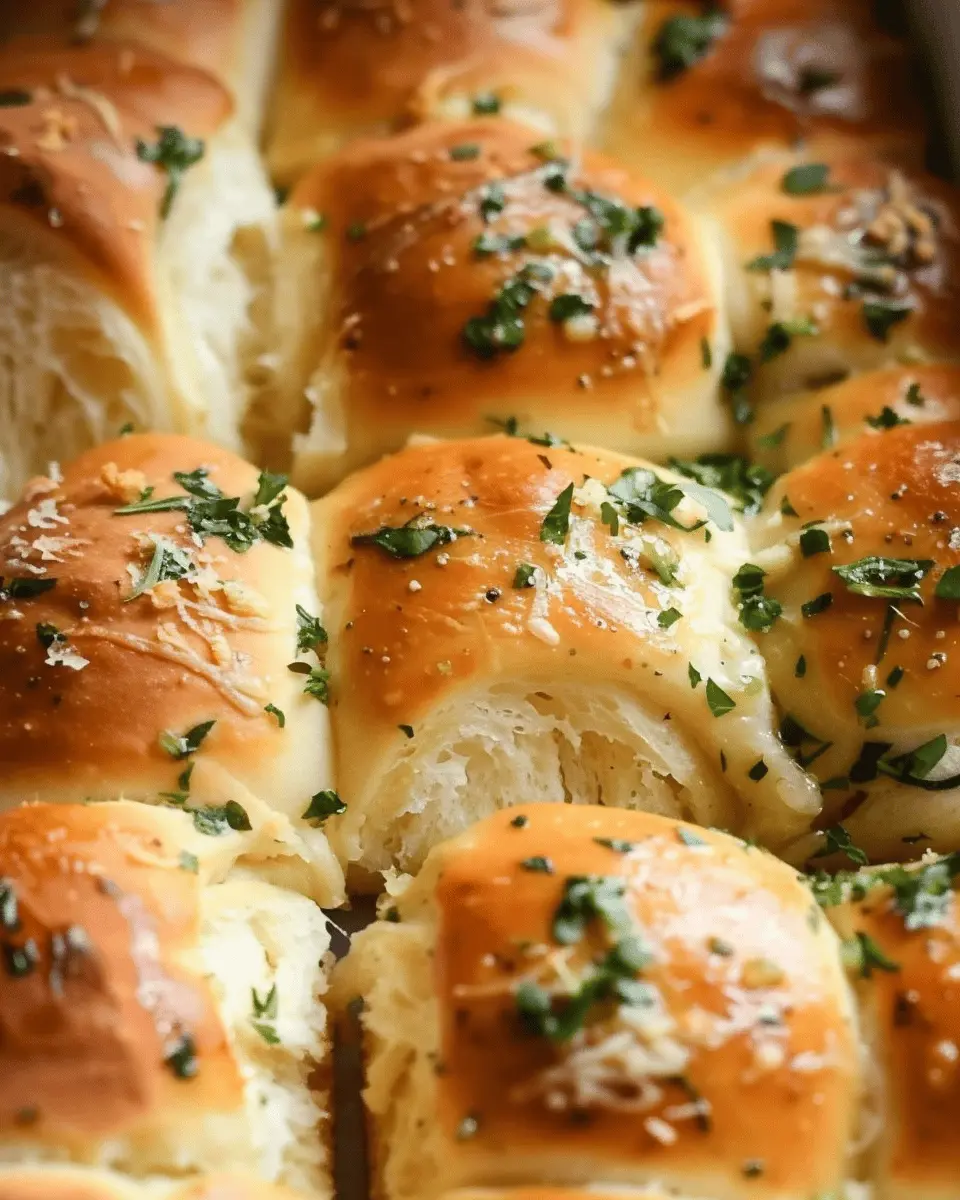
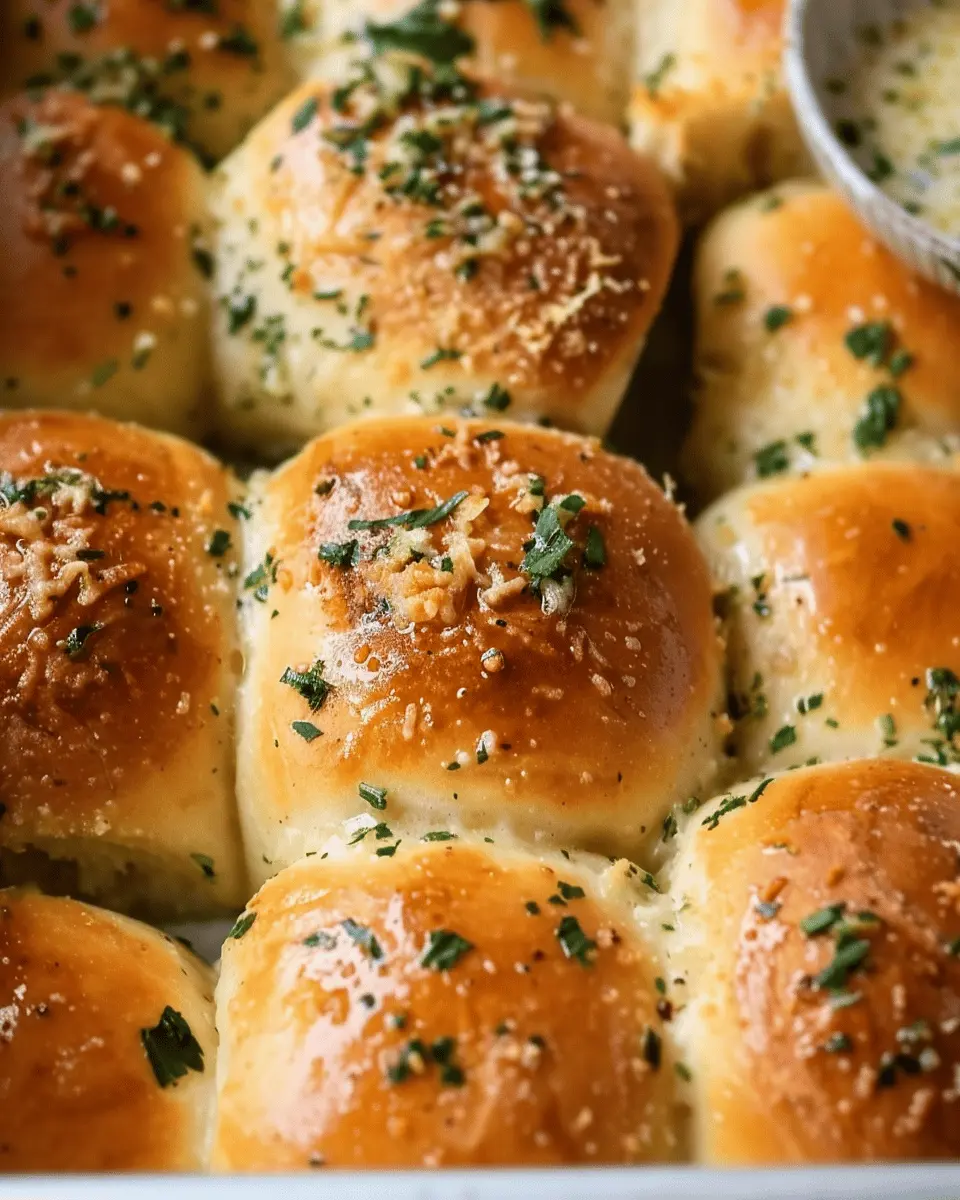
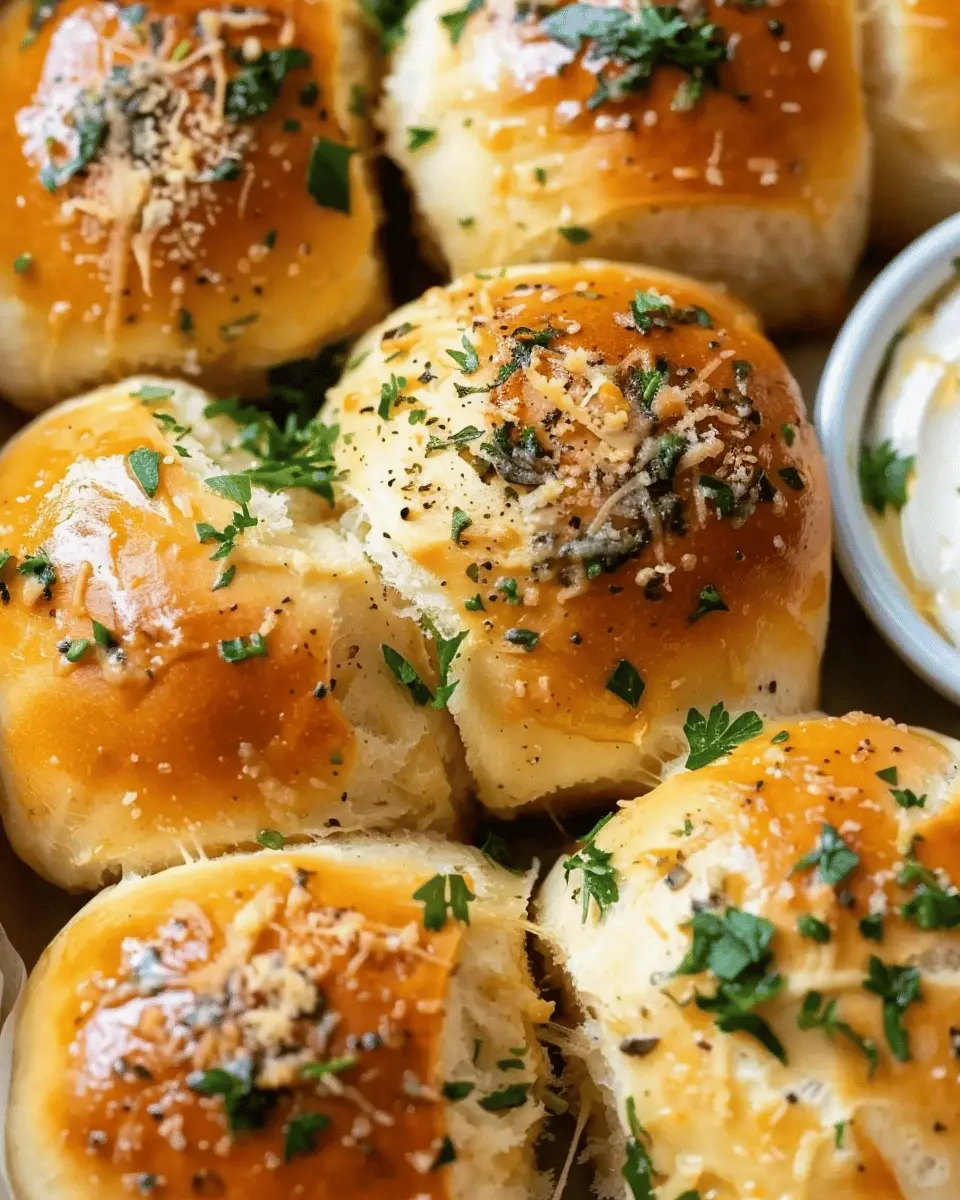
Brush with garlic butter and sprinkle with salt
When your garlic bread rolls come out of the oven, brush them generously with the remaining garlic butter. This adds moisture and that luxurious garlic flavor we all crave. Sprinkle with a little flaky sea salt while they’re still warm to finish. This step is crucial as it enhances the overall flavor profile, making each bite heavenly.
Trust me, these rolls are irresistible when served warm alongside your favorite pasta dish or as a stand-alone snack. Enjoy your homemade garlic bread rolls, and watch as everyone asks for your secret!
By following this simple guide, you’ll have an easy, tasty recipe that’s sure to become a family favorite. Happy baking!
Variations on Garlic Bread Rolls
Garlic bread rolls are a beloved classic, and there are countless ways to put a unique twist on them. Let’s explore a few delightful variations that can elevate your dining experience!
Garlic Herb Rolls with Cheese
Imagine biting into soft, fluffy rolls, enveloped in a rich blend of garlic and assorted herbs, with gooey melted cheese woven throughout. For this variation, mix fresh herbs like parsley, basil, and oregano with minced garlic in your butter before slathering it onto the dough. Additionally, consider adding shredded mozzarella or parmesan cheese right inside the roll. This extra layer gives these garlic bread rolls an indulgent yet aromatic touch.
Spicy Garlic Rolls with Red Pepper Flakes
If you crave a bit of heat, spicy garlic rolls might just be your perfect match. To make them, simply sprinkle red pepper flakes into the butter-garlic mixture before brushing it on your dough. You can also incorporate diced jalapeños for an extra kick. Not only do these garlic bread rolls tantalize the taste buds, but they also provide a delightful contrast to creamy soups or savory salads.
Whole Wheat Garlic Bread Rolls
For a healthier twist, try making whole wheat garlic bread rolls. Using whole wheat flour increases the fiber content while still delivering that comforting, soft roll experience. Pair it with your favorite herbs and garlic for a nutritious yet flavorful option. These rolls are perfect for guilt-free indulgence—great for those seeking a lighter alternative while still enjoying the rich flavors.
No matter how you choose to personalize your garlic bread rolls, the variations are not just about flavor but also about creating a fun and enjoyable cooking experience. Happy baking!
Cooking Tips and Notes for Garlic Bread Rolls
Measuring Ingredients for Success
When it comes to making scrumptious garlic bread rolls, precise measuring is vital. A kitchen scale can be your best friend here—especially for flour and yeast. Did you know that 1 cup of flour can weigh anywhere from 120 to 150 grams depending on how it’s packed? Use a digital kitchen scale for consistent results every time. For liquids, always use a clear measuring cup for accuracy.
Yeast Tips for Perfect Texture
The success of your garlic bread rolls largely depends on the yeast. Make sure your yeast is fresh; expired or improperly stored yeast won’t rise well. When activating dried yeast, sprinkle it over warm water (105°F to 110°F) with a pinch of sugar and let it sit for about 5-10 minutes until it bubbles. This ensures it’s alive and ready to work its magic!
Finally, allow the dough ample time to rise in a warm, draft-free environment—this is where the best flavor develops. Feeling adventurous? Check out this guide on working with yeast for more tips!
Serving Suggestions for Garlic Bread Rolls
Pairings with Soups and Salads
Garlic bread rolls are an excellent companion to a wide variety of soups and salads. Their warm, buttery goodness complements classic dishes like tomato basil soup or a hearty minestrone. Imagine tearing into a roll while savoring a comforting bowl of creamy potato soup—heavenly! If you’re enjoying a fresh green salad, consider using the rolls to scoop up your favorite dressing.
Try pairing with:
- Creamy broccoli soup
- Caesar salad
- Lentil soup
For more flavorful combinations, check out this article on food pairings.
Using Them in Creative Sandwiches
Elevate your lunch game by using garlic bread rolls to create delicious sandwiches. Think of the crispy crust and soft interior as perfect vessels for your favorite fillings. Layer in some turkey bacon, chicken ham, and fresh veggies for a satisfying meal. You can even transform leftover roast beef into a mouthwatering sandwich that’s easy to make.
Try these combinations:
- Turkey bacon, avocado, and spinach
- Chicken ham with Swiss cheese and arugula
These rolls aren’t just for side dishes—let your creativity run wild!
Time Breakdown for Garlic Bread Rolls
When it comes to making garlic bread rolls, timing is everything! Here’s a quick snapshot to help you manage your kitchen schedule like a pro.
Preparation Time
The prep for these delicious rolls takes about 15 minutes. You’ll mix your dough and incorporate all those delightful garlic herbs and butter to make your kitchen smell amazing.
Rising Time
Patience is key! Allow the dough to rise for about 1 hour. This is when it becomes light and fluffy, which makes for the best texture.
Baking Time
After that, pop the rolls in the oven for about 20 minutes. You’ll want to keep an eye on them for that golden-brown finish.
Total Time
In total, you’re looking at approximately 1 hour and 35 minutes from start to finish. Not too shabby for fresh garlic bread rolls! For tips and tricks on successful bread baking, check out resources on King Arthur Baking or Food Network. Enjoy your baking!
Nutritional Facts for Garlic Bread Rolls
Garlic bread rolls are a delicious side that brings flavor to any meal. When it comes to their nutritional profile, here’s what you need to know:
Calories per roll
On average, each garlic bread roll contains about 150-180 calories. This makes them a satisfying yet reasonable option when you’re looking to enhance a meal without going overboard.
Key nutrients
These rolls not only taste great but also provide:
- Carbohydrates: Essential for energy, making up the bulk of each roll.
- Protein: Helps in muscle repair and growth, especially beneficial when paired with other high-protein foods.
- Garlic Compounds: Packed with antioxidants, garlic is known to boost your immune system and may have heart health benefits.
Remember, portion control is key, and pairing your garlic bread rolls with a protein source like turkey bacon or chicken ham can make a balanced meal. For a deeper dive into the health benefits of garlic, check out this National Institute of Health article.
FAQs About Garlic Bread Rolls
How do I store leftover garlic bread rolls?
Storing leftover garlic bread rolls is simple and ensures that they stay delicious for your next meal. First, let them cool completely before storing to prevent moisture buildup. You can either place them in an airtight container or wrap them well with aluminum foil. They’ll keep well at room temperature for about a day, but if you’re looking to extend their shelf life, consider refrigerating them. If you want to savor that fresh-baked taste later, freezing is an excellent option! Just make sure to wrap each roll tightly in plastic wrap and then place them in a freezer-safe bag. When you’re ready to enjoy them, simply pop them in the oven for a quick reheating.
Can I make garlic bread rolls ahead of time?
Absolutely! Making garlic bread rolls ahead of time is a great idea, especially if you’re prepping for a gathering or special occasion. You can prepare the dough and shape the rolls a few hours in advance, then let them rise in the refrigerator. When you’re ready to bake, just take them out, let them come to room temperature, and proceed with the baking instructions. Alternatively, you can also bake them fully and then freeze. Just be sure to warm them up in the oven to regain that fresh-out-of-the-oven crust.
What can I substitute for fresh garlic?
If you don’t have fresh garlic on hand, don’t worry! There are several handy substitutes for garlic bread rolls. Minced garlic in a jar is a convenient choice—1 teaspoon of jarred garlic typically equals one clove of fresh garlic. Garlic powder can also work in a pinch; use about 1/8 teaspoon for each clove. If you’re looking for a mellower flavor, consider using shallots or garlic salt. However, remember to adjust the overall salt content in your recipe if you do!
For more tips and culinary inspirations, check out The Kitchn and Serious Eats, where you’ll find a treasure trove of information on cooking and ingredient substitutions.
Conclusion on Garlic Bread Rolls
Making garlic bread rolls at home is more than just a recipe; it’s a delightful experience that brings joy to your kitchen. Not only do these rolls fill your home with a mouthwatering aroma, but they also provide a sense of accomplishment. The simplicity of mixing ingredients and watching dough rise is incredibly satisfying. Plus, there’s something special about sharing homemade meals with friends and family. As you enjoy your warm, buttery rolls, reflect on the effort and love that went into creating them. If you’re looking to expand your culinary repertoire, check out more recipes at The Spruce Eats for inspiration!
PrintGarlic Bread Rolls: The Best Homemade Treat for Every Meal
These garlic bread rolls are the perfect accompaniment to any meal, delivering the delightful taste of garlic in a fluffy, buttery roll.
- Prep Time: 15 minutes
- Cook Time: 20 minutes
- Total Time: 1 hour 35 minutes
- Yield: 12 rolls 1x
- Category: Bread
- Method: Baking
- Cuisine: Italian
- Diet: Vegetarian
Ingredients
- 2 cups all-purpose flour
- 1 tablespoon sugar
- 1 teaspoon salt
- 1 packet active dry yeast
- 3/4 cup warm water
- 1/4 cup unsalted butter, melted
- 4 cloves garlic, minced
- 1 tablespoon fresh parsley, chopped
Instructions
- In a bowl, combine warm water, sugar, and yeast. Let it sit for 5 minutes until foamy.
- Add melted butter, salt, and flour; mix until a dough forms.
- Knead on a floured surface for about 5 minutes.
- Place the dough in a greased bowl, cover it, and let it rise for 1 hour.
- Preheat the oven to 375°F (190°C).
- Punch down the dough, shape into rolls, and place on a baking sheet.
- Mix garlic and parsley, then brush over the rolls.
- Bake for 15-20 minutes or until golden brown.
Notes
- For extra flavor, sprinkle some grated cheese on top before baking.
- Serve warm for the best taste experience.
Nutrition
- Serving Size: 1 roll
- Calories: 150
- Sugar: 1g
- Sodium: 180mg
- Fat: 5g
- Saturated Fat: 3g
- Unsaturated Fat: 2g
- Trans Fat: 0g
- Carbohydrates: 24g
- Fiber: 1g
- Protein: 4g
- Cholesterol: 15mg
Keywords: Garlic Bread Rolls, homemade rolls, garlic bread, easy recipes