
Introduction to Homemade Bread
There’s something undeniably special about homemade bread. Just the thought of it conjures warm memories of family gatherings, the enticing aroma wafting through the kitchen, and the satisfying sound of a crusty loaf being sliced. For many of us, bread-making evokes a sense of nostalgia tied to our childhood, when our parents or grandparents would bake loaves from scratch, filling the house with love and warmth.
Why does homemade bread evoke such nostalgia?
The magic of homemade bread goes beyond its delightful taste and texture. This staple food has been a part of human history for thousands of years, played a significant role in culture, and has even been associated with comfort. Studies have shown that the act of baking can invoke feelings of happiness and contentment. According to a report from the National Institute of Health, engaging in activities like cooking and baking can significantly reduce stress.
Think back to when you were a child, perhaps standing on a stool next to a family member in the kitchen, watching flour spill from the bag as they measured out ingredients. That sensory experience—sight, smell, and touch—creates lasting memories connected to the comfort of home. Moreover, in today’s fast-paced world, taking the time to bake homemade bread can serve as a mindful escape from our hectic routines.
-
The Art of Crafting: The beauty of making your own bread lies in mastering the art of patience and simplicity. You can experiment with different flours, herbs, and spices, creating unique flavors that cater to your taste.
-
Nutritional Benefits: Homemade bread allows you to have more control over your ingredients, which can help you make healthier choices. Flour quality and added preservatives are often concerns in store-bought variants.
Baking at home not only fills your kitchen with delightful scents but also fills your heart with joy. So, why not gather some friends or family and turn baking into a fun, shared experience? You can learn more about the different types of bread and their cultural significance at The Kitchn or BBC Good Food, where they offer a wealth of recipes and tips.
With a little bit of patience and practice, you too can create the comforting homemade bread your heart—or your family—truly craves!
Ingredients for Homemade Bread
Basic ingredients for classic bread
To create the perfect homemade bread, you only need a few basic ingredients that you probably already have in your kitchen:
- Flour (preferably bread flour for that delightful chewiness)
- Water (warm water is essential to activate the yeast)
- Yeast (active dry yeast works wonders!)
- Salt (don’t skip this; it enhances flavor)
These core ingredients come together to form the beautifully satisfying loaf that emerges from your oven.
For a deeper dive into the science behind these ingredients, check out this comprehensive guide on bread making.
Optional add-ins for flavor
Once you’ve mastered the basics, feel free to get creative! Adding different ingredients can elevate your homemade bread experience:
- Herbs and spices (think rosemary or garlic)
- Seeds or nuts (sunflower seeds and walnuts add texture)
- Dried fruits (like raisins or cranberries for a sweet twist)
Experimenting with these ingredients can lead to a unique loaf that makes every slice a delightful surprise. What’s your favorite add-in?
Step-by-step Preparation of Homemade Bread
Baking homemade bread can feel like a daunting task, especially if you’re new to the kitchen, but trust me, it’s much simpler than it seems! With just a few ingredients and some patience, you can create a warm, fragrant loaf that will impress your friends and family. Here’s how to make your very own homemade bread, step by step.
Gather your ingredients
Before you dive headfirst into the world of bread-making, you’ll want to ensure you have everything on hand. Here’s a basic list of what you’ll need:
- 4 cups of all-purpose flour
- 2 teaspoons of salt
- 1 tablespoon of sugar
- 2 teaspoons of active dry yeast
- 1 ½ cups of warm water (about 110°F or 43°C)
- A little olive oil for greasing
Having everything prepped and accessible makes the process less stressful and more enjoyable. Plus, it gives you a chance to admire those beautiful ingredients before they become something extraordinary.
Activate the yeast
Now, let’s get that homemade bread adventure started by bringing your yeast to life! Just sprinkle the 2 teaspoons of yeast along with the tablespoon of sugar into the warm water in a bowl. Let it sit for about 5-10 minutes until it becomes frothy. This step is crucial; it shows that your yeast is alive and will help your bread rise beautifully. If you’re keen on learning more about yeast and its magical properties, check out this article on How Yeast Works from King Arthur Baking.
Mix the ingredients
In a large mixing bowl, combine the flour and salt. After your yeast has activated, pour in the yeast mixture. Stir with a wooden spoon or spatula until everything begins to come together—it might seem a bit shaggy at first and that’s okay! The dough’s texture should be slightly sticky yet hold itself together.
Knead the dough
Here’s where your muscles come into play! Turn the dough out onto a floured surface and begin to knead. This process helps develop gluten, giving your homemade bread that delightful chewy texture. Knead for about 10 minutes, or until the dough is smooth and elastic. If you’re unsure about how to knead, don’t worry—there are plenty of videos online that can show you the basic technique!
Let it rise
Place your kneaded dough into a lightly oiled bowl and cover it with a clean kitchen towel. Allow it to rise in a warm, draft-free area for about 1 to 2 hours, or until it has doubled in size. This is a good time to take a moment for yourself. Perhaps enjoy a cup of coffee or catch up on that series you’ve been binging!
Shape the bread
Once the dough has risen, turn it out onto a lightly floured surface again. Gently deflate the dough—this is key, as it helps redistribute the yeast. Shape it into a loaf by folding and tucking the edges until you form a nice round shape. You can place the shaped dough in a greased loaf pan or on a baking sheet.
Final rise
Cover your shaped loaf and let it rise again for about 30 minutes to an hour. This final rise allows the bread to develop even more flavor and texture.
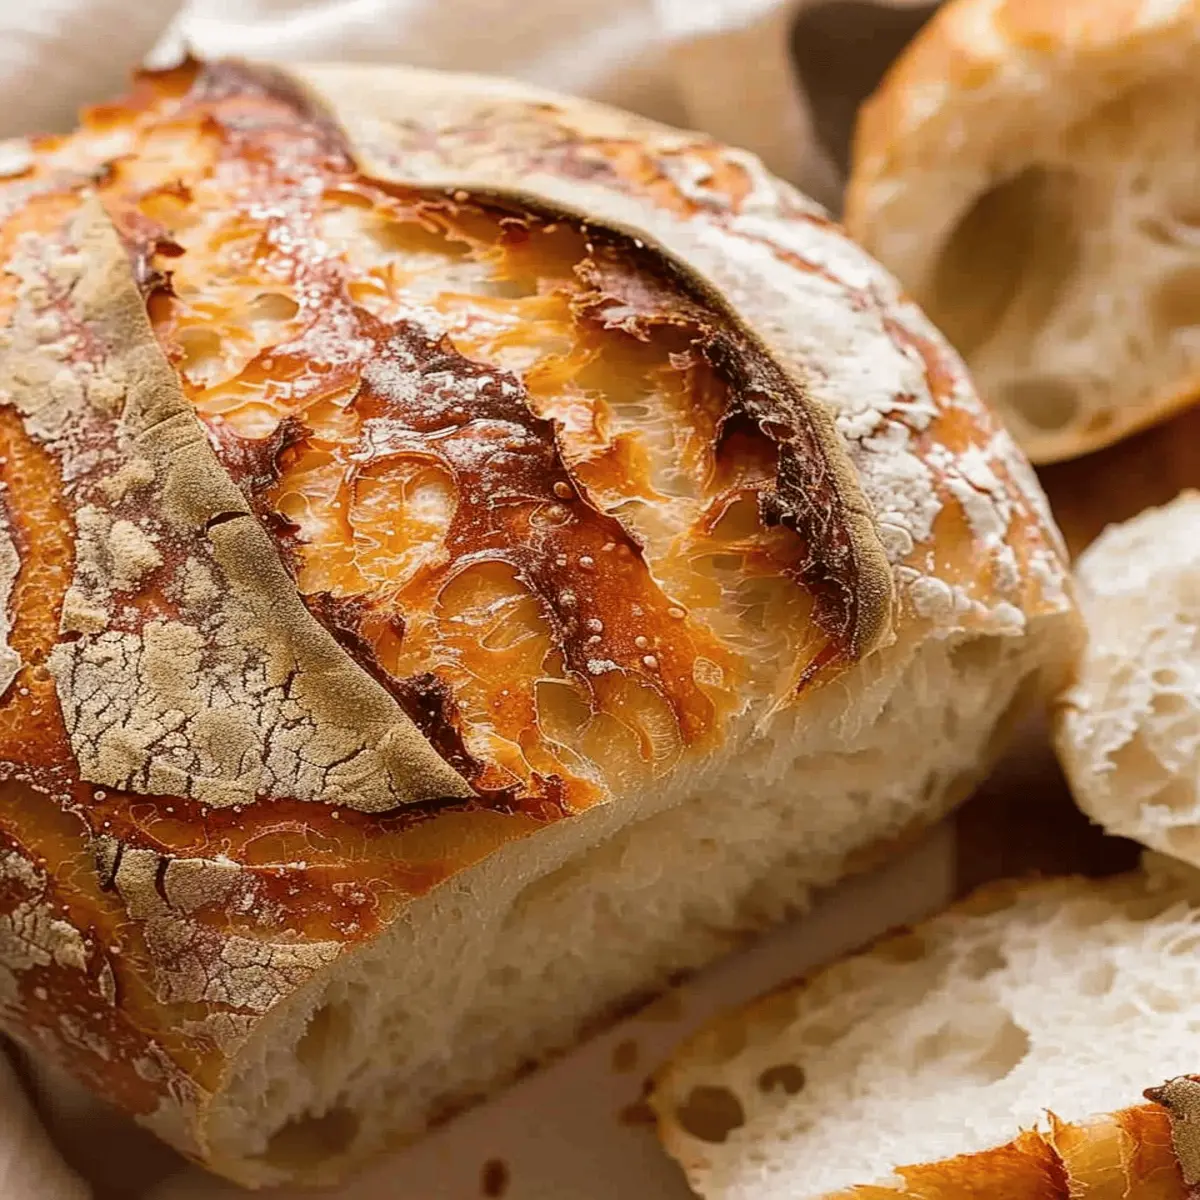
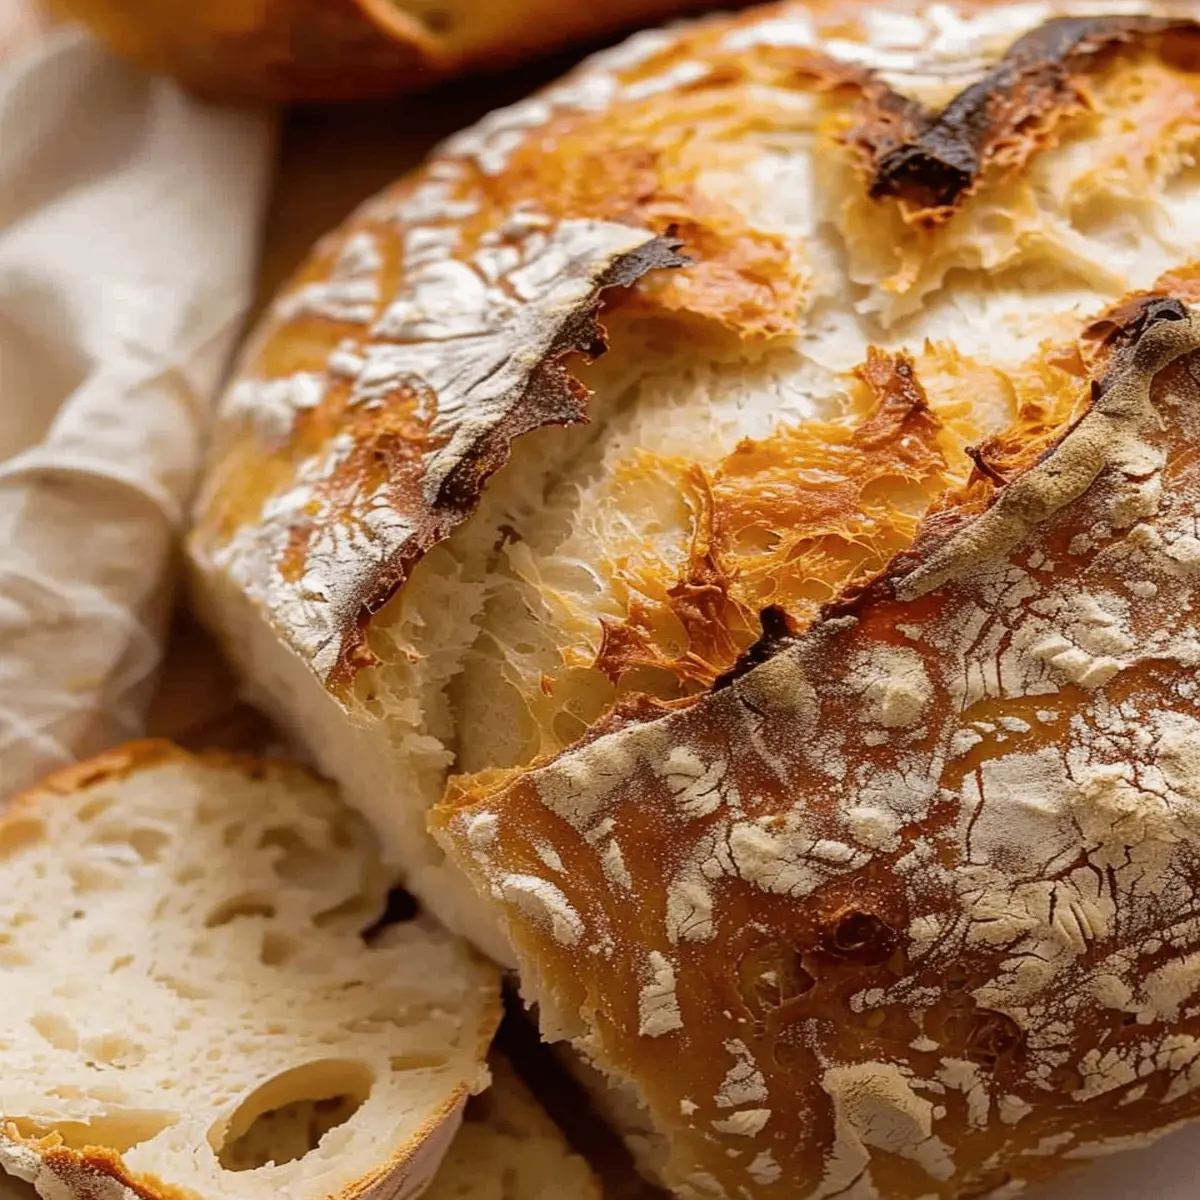
Bake the bread
Preheat your oven to 375°F (190°C). Once your loaf has puffed up nicely, it’s time to bake! Slide it into the oven and let it bake for about 30-35 minutes or until the top is golden brown and sounds hollow when tapped. If you can, resist the urge to cut into it immediately—let it cool for at least 10 minutes on a wire rack first. This helps finalize the baking process and creates a better texture.
And just like that, you’ve created a delicious loaf of homemade bread! What could be more satisfying than savoring the fruits of your labor? Give your bread-making a try, and who knows, you might just discover a new favorite hobby.
Variations on Homemade Bread
When it comes to homemade bread, the possibilities are virtually endless! Whether you’re looking to impress dinner guests or simply enjoy a comforting slice at breakfast, experimenting with flavors can elevate your baking game. Here are a couple of delightful variations to consider:
Flavorful Herb-Infused Bread
Imagine walking into your kitchen and being greeted by the luscious scent of fresh herbs wafting through the air. Herb-infused homemade bread can accomplish just that. Incorporating ingredients like rosemary, thyme, or basil can add a wonderful depth of flavor. Here’s how to get started:
- Choose Your Herbs: Fresh herbs will yield the best aroma, but dried ones can work, too.
- Mix Well: Fold chopped herbs into your dough during the mixing stage.
- Add Cheese: Consider mixing in Parmesan or cheddar for an extra pop of flavor!
A fantastic resource on herb pairings can be found at the American Culinary Federation for those looking to dive deeper.
Sweet and Fruity Breads
For a fun twist on traditional homemade bread, why not try a sweet, fruity variant? These breads are perfect for brunch or as a quick snack. Options like banana bread or cranberry-orange bread can be both delicious and visually appealing. Here’s how to whip them up:
- Banana Bread: Use overripe bananas for natural sweetness and moistness.
- Cranberry-Orange: Fresh cranberries paired with a hint of orange zest deliver a delightful tartness.
Both options are easy to make and can be tailored to your liking.
With these variations, your homemade bread can turn into a delightful experience, inviting friends and family to savor every slice. Happy baking!
Cooking Tips and Notes for Homemade Bread
Creating the perfect homemade bread can sometimes be tricky, but don’t worry! Here are some common troubleshooting tips to help you succeed.
Common Troubleshooting Tips
-
Dough Too Sticky? If your dough is a sticky mess, it may need a bit more flour. Add it gradually, as too much can make your bread dense. For extra guidance, check out this flour guide from King Arthur.
-
Bread Not Rising? Insufficient yeast activity might be the culprit. Make sure your yeast is fresh and that you’re using warm (not hot) water. If you’re unsure, here’s a link about reviving yeast that might help you.
-
Crust Too Hard? If your crust is tougher than you’d like, consider adjusting your baking time. A lower temperature for a longer time can yield a softer crust.
Remember, homemade bread is as much about enjoyment as it is about results! Each loaf is a new experience; embrace the journey, learn from it, and savor the delicious reward. Happy baking!

Serving Suggestions for Homemade Bread
Perfect Pairings with Soups and Salads
Homemade bread is more than just a side; it can elevate your entire meal! Consider serving a warm loaf alongside your favorite soups—nothing beats a crusty slice of artisan bread with rich, creamy tomato soup. Or try it with a vibrant, zesty salad; the crunch and texture of your bread beautifully complement fresh greens. For a deeper dive into seasonal soup recipes, you might want to explore this collection.
Delectable Spreads and Toppings
The beauty of homemade bread lies in its versatility. Try slathering a slice with:
- Creamy butter with a hint of sea salt
- Avocado mash topped with crushed red pepper
- Herbed cream cheese for a delightful twist
Feeling adventurous? Whip up a batch of garlic confit or a tangy tapenade to really impress your guests. The options are endless!
Using these ideas, you’ll create not just meals, but memorable dining experiences with your delicious homemade bread. Why not take a moment to explore the endless combinations? Your taste buds will thank you!
Time Breakdown for Homemade Bread
Understanding the time needed for homemade bread contributes to a smooth baking experience. Here’s a breakdown to help you plan your day accordingly.
Preparation time
Getting started with your ingredients is simple! Set aside about 15-20 minutes to mix and knead your dough. This hands-on phase allows you to connect with your ingredients, and it’s surprisingly satisfying.
Rising time
Patience is key here. You’ll want to let your dough rise for approximately 1 to 2 hours. This is when the magic happens! The dough will double in size, creating that lovely airy texture we all crave in a loaf.
Baking time
Once risen, the baking process is quick: about 25-30 minutes in the oven. The aroma wafting through your home is nothing short of delightful.
Total time
In total, you’re looking at around 2 to 3 hours from start to finish, depending on your rising time. Remember, it’s not just about the clock; it’s about enjoying the process!
For more tips on baking techniques, check out King Arthur Baking or The Kitchn.
Nutritional Facts for Homemade Bread
Calories per slice
When you bake your own homemade bread, you might be surprised by how many calories a slice packs. On average, a slice of homemade bread contains around 80–100 calories depending on the ingredients you choose. This is a delightful alternative to many store-bought breads, which often come loaded with preservatives and added sugars.
Key nutrients
Making homemade bread allows you to select high-quality ingredients that benefit your health. Here are some key nutrients you can expect:
- Fiber: Whole grain flours add more fiber, aiding digestion and keeping you full longer.
- Protein: Bread made with high-protein flour helps support muscle growth and repair.
- Vitamins and Minerals: Ingredients like seeds, nuts, and whole grains boost your intake of essential nutrients, like B vitamins, iron, and magnesium.
Curious to learn more about how whole grains can impact your diet positively? Check out this resource from the Whole Grains Council. Embracing homemade bread not only satisfies your cravings but also nourishes your body in delicious ways.
FAQs About Homemade Bread
Can I use whole wheat flour?
Absolutely! Homemade bread made with whole wheat flour tends to be denser but equally delicious. For best results, consider a blend of whole wheat and all-purpose flour to lighten the texture while still reaping the nutritional benefits of whole grains. You might want to increase the liquid slightly, as whole wheat flour absorbs more moisture. Experimenting with different ratios can lead you to your perfect loaf!
What’s the best way to store homemade bread?
Storing your homemade bread properly is key to keeping that fresh-baked goodness intact. Here are a few tips:
- Room Temperature: If you plan to eat your bread within a few days, keep it in a breadbox, a cloth bag, or wrapped in a clean kitchen towel. This ensures airflow while preventing it from drying out.
- Freezing: For longer storage, slice and freeze your bread. Place it in an airtight bag, and it can last up to three months. Just toast or thaw slices as needed for a fresh taste anytime!
How can I tell when the bread is done baking?
Knowing when your bread is perfectly baked can be tricky. Generally, a good rule of thumb is to:
- Tap the bottom of the loaf: If it sounds hollow, it’s done!
- Check the color: It should be a lovely golden brown.
- Internal temperature: Use an instant-read thermometer—aim for around 190°F for most loaves. This step ensures your homemade bread is not just crusty but cooked through.
For more tips on baking perfection, check out this bread-baking guide! Happy baking!
Conclusion on Homemade Bread
Embracing the Joy of Baking at Home
In today’s fast-paced world, there’s something incredibly satisfying about homemade bread. The aroma that fills your kitchen, the warmth of freshly baked loaves, and even the small victories in getting that perfect crust can brighten any day. Baking at home not only allows you to control ingredients but also encourages creativity.
- Explore Your Options: Try different flours, mix in seeds or herbs, and adapt recipes to suit your taste.
- Practice Mindfulness: Use baking as a meditative practice, allowing yourself to focus and relax in the process.
Ready to dive into the world of homemade bread? Embrace the adventure, and don’t hesitate! For more insights and tips, explore sources like King Arthur Baking and The Bread Lab. Your kitchen awaits!
PrintHomemade Bread Magic: The Easy Way to Bake Blissful Loaves

Discover the secret to baking homemade bread that is both delicious and satisfying. This guide provides all the tips and tricks you need to create the perfect loaf.
- Prep Time: 20 minutes
- Cook Time: 35 minutes
- Total Time: 1 hour 55 minutes
- Yield: 1 loaf 1x
- Category: Bread
- Method: Baking
- Cuisine: American
- Diet: Vegetarian
Ingredients
- 4 cups all-purpose flour
- 2 teaspoons salt
- 1 packet instant yeast (2 1/4 teaspoons)
- 1 3/4 cups warm water
- 1 tablespoon sugar
Instructions
- In a large bowl, combine warm water and sugar. Sprinkle yeast on top and let it sit for 5 minutes until foamy.
- Add the flour and salt to the mixture and stir until a dough forms.
- Knead the dough on a floured surface for about 10 minutes until smooth.
- Place in a greased bowl, cover, and let rise for 1 hour or until doubled in size.
- Punch down the dough and shape it into a loaf. Place it in a greased loaf pan.
- Cover and let it rise for another 30 minutes.
- Preheat the oven to 375°F (190°C). Bake for 30-35 minutes until golden brown.
- Let cool before slicing.
Notes
- For a crustier loaf, place a pan of water in the oven while baking.
- You can add herbs or cheese to the dough for extra flavor.
Nutrition
- Serving Size: 1 slice
- Calories: 150
- Sugar: 1g
- Sodium: 320mg
- Fat: 1.5g
- Saturated Fat: 0.3g
- Unsaturated Fat: 1g
- Trans Fat: 0g
- Carbohydrates: 28g
- Fiber: 1g
- Protein: 5g
- Cholesterol: 0mg
Keywords: Homemade Bread, Baking, Easy Bread Recipes